
 I’ve told him not once, not twice but at least a million times. “Don’t skid, use your brakes properly”. Apparently doing it properly is not much fun. However I had the chance a few weeks ago to show my little back brake skidding boy the outcome of all his “awesome” skidding which was pretty much no tread left on his back tyre.
Isaac and I had a bit of a discussion about looking after his bike so that this kind of wear isn’t sped up tenfold…He looked concerned at the time.
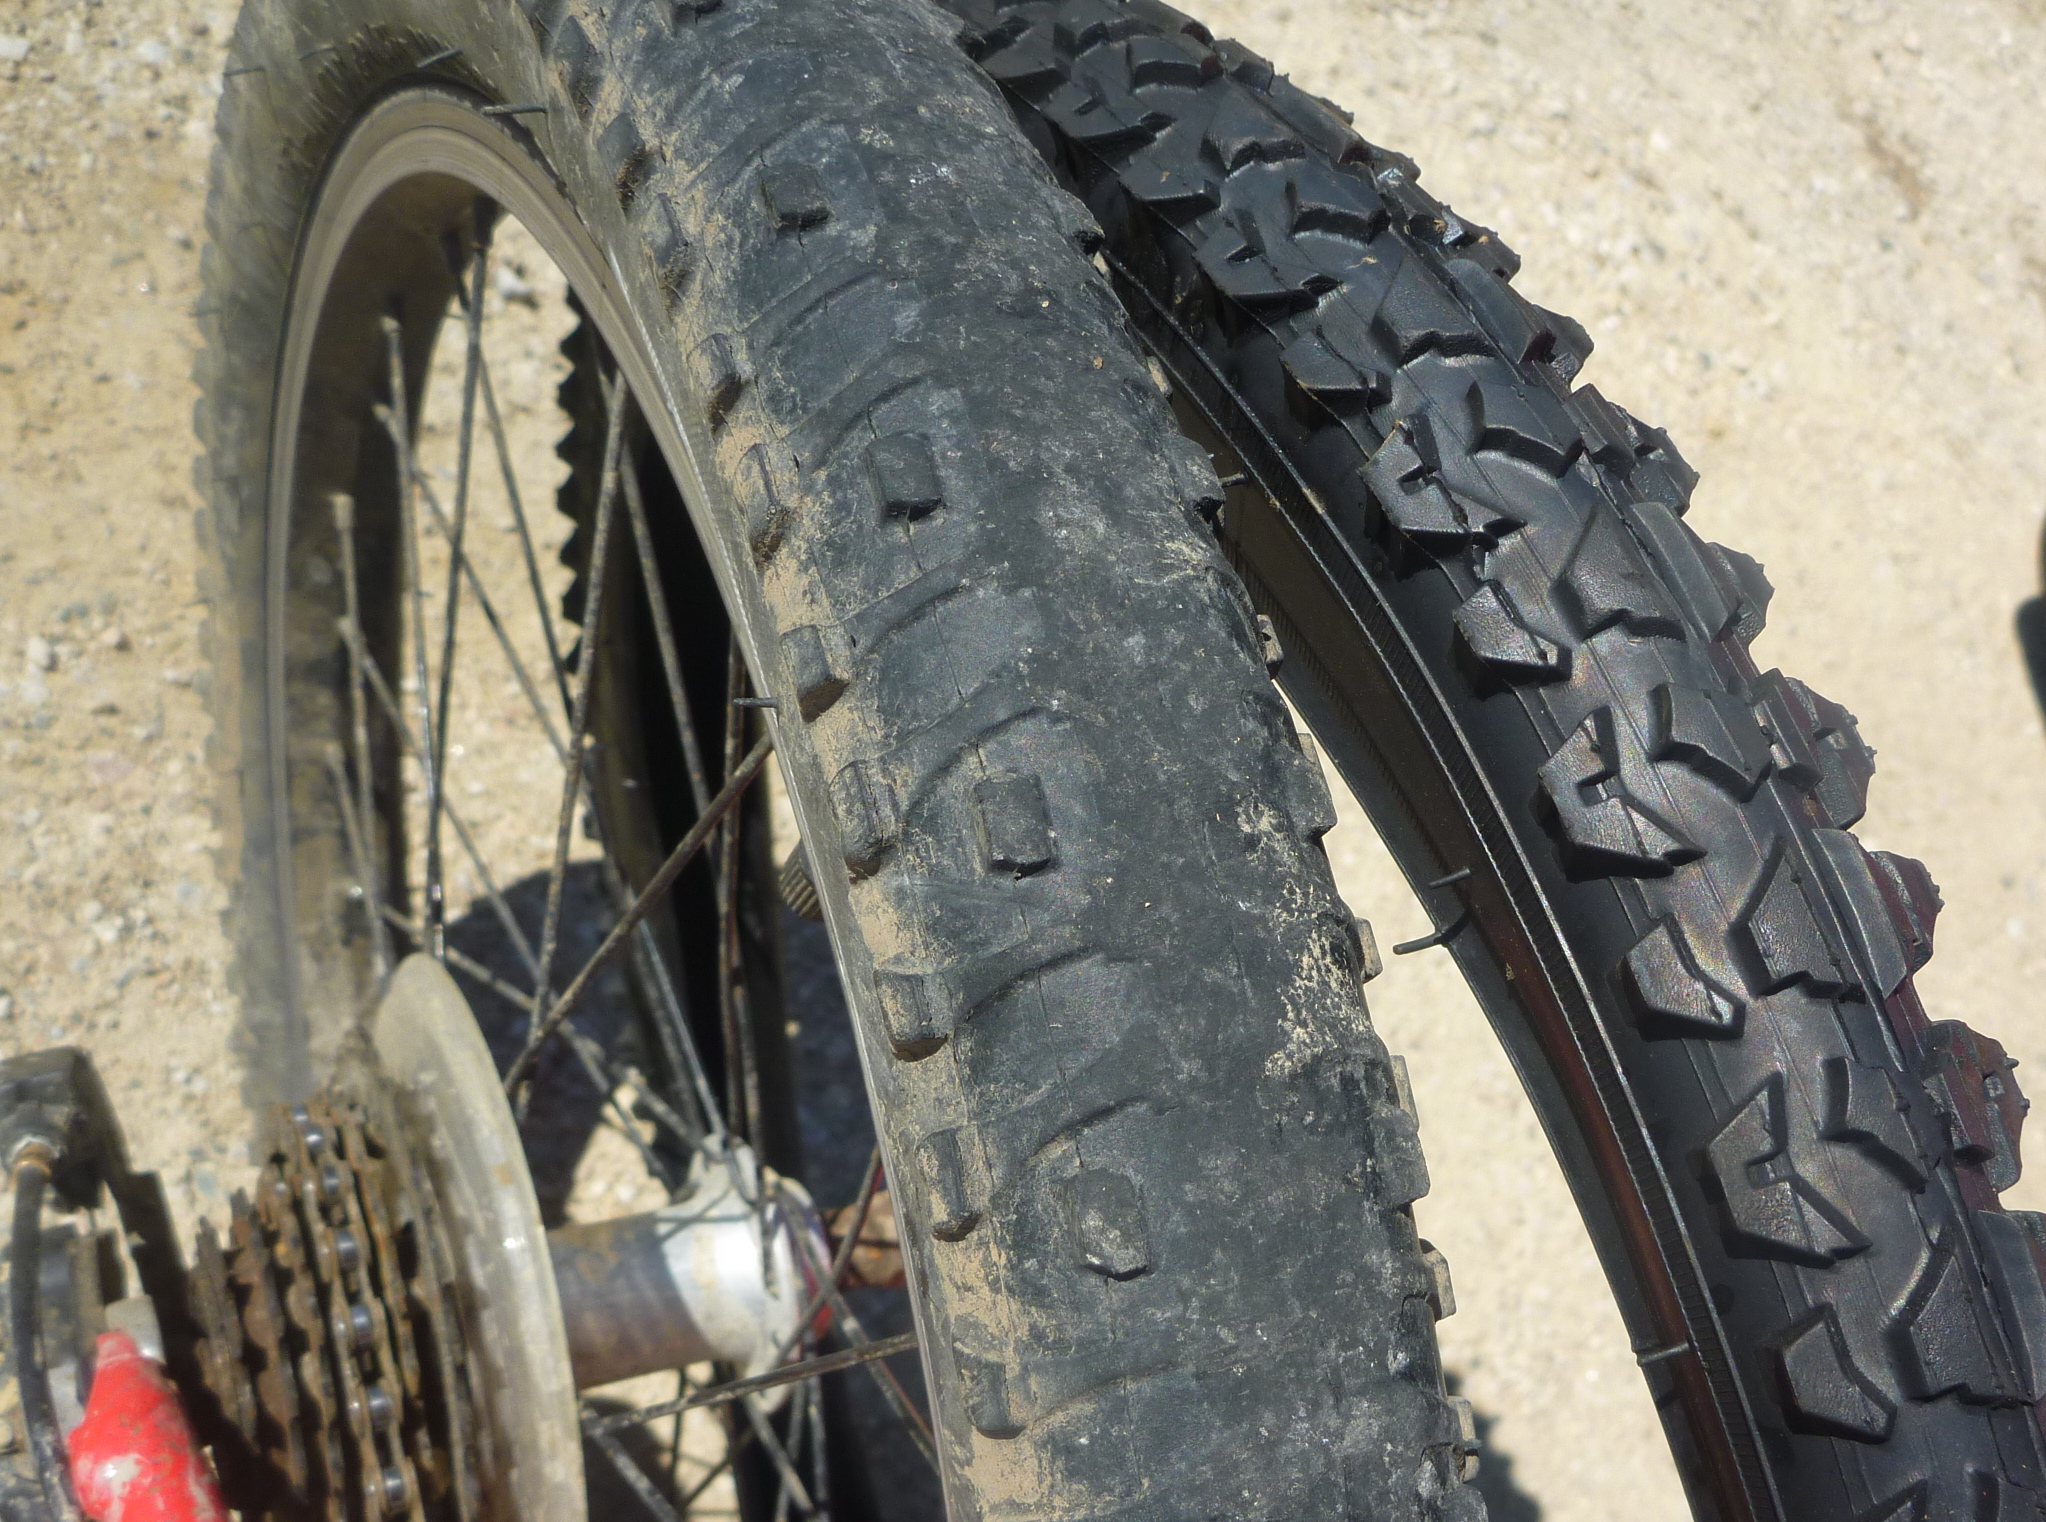
Skidding quickly wears out the tread on tyres. What’s a tread? The knobbly bumpy bits that stick up from your tyre. Tread gives you traction on the ground so if it’s not there anymore you may notice a bit of slipping around on certain terrain or in the wet. The photo below is of Isaac’s rear wheel tyre, next to it is the new tyre with all the tread. Pretty easy to see the difference. Checking the tread should be one of those things that you do every 6 months to a year because even if you’re not a skidder your tread will eventually wear down. You should also make it one of the things you look at whenever you clean your bike – Cleaning Your Bike Tyre.
What will you need to change a bike tyre?
- a new tyre that’s the correct size – look on the side wall of your tyre for the number (kids 12, 16, 20, 24, adults 26, 27, 29). See Bike Parts – The Bike Tyre if you want to know more about the bike tyre.
- a tyre lever/ set of tyre lever (see Bike Tools – The Tyre Lever for info on this tool).
- an adjustable spanner if the wheel you’re working on is bolted to the bike otherwise use the quick release.
- a bike pump (see Bike Tools – The Bike Pump for info on this tool).
Ok, what’s your first move?
Take the wheel off the bike using your spanner or by opening the quick release. (For more detail about taking a wheel off and getting it back on click here)
Let all the air out of the tyre you are changing by pressing on the needle in the middle of the valve. Don’t skip this step – it’s almost impossible to get your tyre off when the tube is pumped full of air.
Now it’s time to use your tyre lever (check out our story on the tyre lever if you haven’t used one before) – my at home workshop one looks like this… These are great because your knuckles are protected in case the lever slips and you end up punching the wheel spokes at high speed – which hurts.
You need to get the curve end between the tyre and the metal rim of your wheel then push the lever down which will pop the tyre over the edge. Once you have the tyre over the edge slide the lever around the entire circumference of the wheel so that one side of the tyre is off the rim. Now I said that and made it sound so easy, at times it is not. This depends on the tyre and how tight the fit is so be patient. In these photos I only had to use one tyre lever – it’s a kids bike.


When I do my tyre on my mountain bike a have to use two or three levers. Position the first lever as you did above then keep pushing down until the opposite end will hook onto a spoke to stay fixed in place. Your next move is to insert a second tyre lever right next to the first one but now slide it rather than fixing it. Keep doing this until you have enough of the tyre off the rim to be able to pull it completely off the wheel. Then pull the tube out of the worn bike tyre and put it with the new bike tyre. (If any or all of this sounded confusing please have a look at our Bike Tools – Tyre Lever story).
Putting the New Bike Tyre On.
What’s your first move? Check the rotation on the tyre. What?… If your tyre has a tread chances are it is designed to work in a certain direction. So look on the sidewall  of your tyre. In the photo under the word “Rotation” is an arrow so this is easy to find, sometimes you will be looking for only an arrow. So work out in your head which way round the tyre has to be so the arrow is moving in the direction it is pointing.
With that in your head put the new tyre on the wheel rim so that one side is completely sitting inside the rim. Place the deflated bike tube back into the wheel rim pushing the valve down through the hole.
We will begin to push the other side of the bike tyre over the rim now.  Begin at the valve and using your thumbs push the tyre over the rim. Once you have a couple of inches on each side of the valve, stop and pull the valve as far down as it will go.
This makes sure that the bike tube sits right down into the rim of the wheel and means it is less likely to get pinched between the rim and the tyre.
OK, now you need both hands so it’s best to sit down and put the wheel in your lap. Using your thumbs push the remaining edge of the bike tyre over the wheel rim. Aim to push close to the rim and use your hands to push and slightly twist the bike tyre.
 Oh so easy to say this, not so easy to do this, again be patient. If this is just not working you can use your bike tyre levers. But this involves a slight risk. When inserting the bike lever it is quite easy to pinch the tube onto the rim of the wheel – meaning you may puncture the tube. Just when you feel really good about getting your tyre back on pumping it up will let you know that you have to take it all off again to fix the pinched tube!
So if you have to use this method go slowly and carefully and good luck. Insert a tyre lever and push it up flicking the tyre over the rim.

Last couple of things.
- put the wheel back on the bike
- pump up the tyre to the recommended PSI – check the sidewall of the tyre or use the “squeeze test”. If you need help with pumping up your tyre, valves or finding your PSI go to our Pumping Up Your Bike Tyre story.
Great, let me know how you got on. Please ask a question if you’re not quite sure of something…otherwise have fun riding on those new tyres.
[themeone_section type=”full-width” bgcolor=”#fafafa” txtcolor=”dark” decotop=”” decobot=””]
Thanks for reading. Used together our stories, resources & products support you to achieve and develop as a rider.
goRide helps you to find your riding SMILE. Now it’s your turn…. Contact goRide. Your thoughts, comments or feedback will back us SMILE.
[/themeone_section]
Women
Padded Bike Underwear
Pants for Biking
Tops for Biking
Jackets & Over Trousers for Biking
Riding Clothing for Larger Sizes
Warmth Accessories
Bike Saddles
Bike Helmets
Mountain Bike Helmets
Bike Gloves
Protective Padding
Bike Bells
Hydration
Handlebar Grips
Kids & Youth
Padded Bike Underwear
Bike Helmets
Mountain Bike Helmets
Riding Clothing
Jackets for Biking/Outdoors
Protective Padding
Bike Gloves
Bike Lights
Bike Bells
Handlebar Grips
Bike Saddle
Bike Locks
Hydration
Family
Ride with a baby/ 1 year old
Ride with a 2-6 year old
Ride with a 4 + year old – on their own bike
Full Range Kids Bike Seats – Attached or Towed
Create a Family Biking Holiday
Ride More Places with Kids
Men
Padded Bike Underwear
Bike Helmets
Mountain Bike Helmets
Bike Saddles
Bike Tops,Jackets & Over Trousers
Bike Gloves
Protective Padding
Handlebar Grips
Bike Bell
Be comfortable & confident
Successfully Ride an E-Bike
Beginner Rider
Heavy Riders – Enjoy Biking
Be Comfortable on your Bike Seat
Riding in Cooler Weather
Riding in Wet Conditions
Be Visible on the Bike
Enjoy a Biking Holiday
‘Fun Up’ the Kids Bike/Biking
goUnders- Padded Bike Underwear
Women, Mens, Youth & Kids

SHOP goUnders.
Clothing & Bags
Padded Bike Pants & Underwear
Pants & Shorts for Biking
Bike Tops
Bike Jackets
Over Trousers for Biking
Headbands & Neck Warmers for Biking
Bags, Baskets & Panniers for Biking
Rider Safety & Protection
Bike Helmets
Mountain Bike Helmets
Bike Gloves
Protective Padding
Bike Lights
Bike Bells
First Aid & Personal Care
Hydration
Bike Tow Ropes
Bike Parts & Care
Bike Saddles
Handlebar Grips
Bike Locks
Bike Carriers
Bike & Chain Cleaning
Bike Tools & Tool Kits to Carry
Kids Bike Seats & Bikes
Rear Kids Bike Seats
Mid Kids Bike Seats
Front Kids Bike Seats
Towing Kids who ride their own Bike
Bike Trailers for Kids
Kids Balance Bikes
HIRE Kids Bike Seats
Be Comfortable & Confident
Comfort on your Bike Seat
Be Visible on the Bike
Beginner Riders
Get Started – Ride with a baby
Heavy Riders – Enjoy Biking
Riding in Cooler Weather
Riding in Wet Conditions
‘Fun Up’ the Kids Bike/Biking
Bike Path Riding
Beginner to Fitness
Multi-Day
With Kids of all Ages
Kids Riding Bikepaths
Multi-Day with Kids
Bike Path Riding Guide
Ride more Bikepaths
Mountain Biking
Women Beginner to Intermediate
Men Beginner to Intermediate
Multi-Day
With Kids of all ages
Kids Mountain Biking
Multi-Day with Kids
Mountain Biking Guide
Ride more Mountain Bike Trails
Riding in Traffic
Be Visible in Traffic
Commuting
With Kids of all Ages
Kids Riding in Traffic
E – Biking
E-Biking in Traffic
E-Biking on Bikepaths
E-Biking on MTB Trails
A Biking Holiday
E-Biking Guide
Multi-Day Riding
Multi-Day on Bike Paths
Multi-Day on MTB Trails
Multi-Day with Kids on Bike Paths
Multi-Day with Kids on MTB Trails
Multi-Day Guide
A Biking Holiday
Family Biking Holiday
Ride more Multi-Day Rides
Family Riding
Full Range Kids Bike Seats – Attached or Towed
On Bikepaths with Kids
MTB with Kids
In Traffic with Kids
Family Biking Holiday
Family Riding Guide
Ride More Places with Kids
Kids Attached or Towed Buying Guides
Rear Kids Bike Seat
Mid Mount Kids Bike Seat
Front Kids Bike Seat
Towing Kids who ride their own bikes
Kids Bike Trailers
Kids & Youth Buying Guides
Kids Bike Helmets
Kids Riding Clothing
Kids Padded Bike Pants
Kids Padded Protection
Kids Handlebar Grips
Kids Balance Bike
Comfort on the Bike Buying Guides
Womens Bike Saddle
Mens Bike Saddle
Padded Bike Pants
Bike Jackets
Carrying Gear
Handlebar Grip
Hydration
Rider Safety Buying Guides
Bike Helmet
Mountain Bike Helmet
Protective Padding
Be Visible
Bike Glove
Bike Light
Mountain Bike Light
First Aid & Personal Care
Gear & Care for Bikes Buying Guides
Bike Carriers
Bike Cleaning
Bike Locks
Chain Cleaning and Lube
goUnders- Padded Bike Underwear
Women, Mens, Youth & Kids
SHOP goUnders.
Women & Families Learning
Comfort on your Bike Seat
Clothing for Biking
Family Biking
Improve your Riding
Carrying Gear
Care for ‘you’
Care for your Bike
Ride More Places
Ride more Bikepaths
Ride more NZ Cycle Trails
Ride more Mountain Bike Trails
Ride more Multi-Day Rides
Ride more Places with Kids
Riding Gear
Bike Helmets
Bike Saddles
Padded Bike Underwear & Pants
Bike Gloves
Bike Jackets
Protective Padding
Bike Locks
Bike Lights
Bike Tools to Carry
Handlebar Grips
Bike and Chain Cleaning
Kids Bike Seats & Bikes
Kids Bike Trailer
Towing kids who ride their own bike
Rear Kids Bike Seats
Mid Mount Kids Bike Seats
Front Kids Bike Seats
Balance Bike
Types of Riding
Bikepath Riding
Family Riding
E-Bike Riding
goUnders- Padded Bike Underwear
Women, Mens, Youth & Kids
SHOP goUnders.