
Have you ever watched a kid climb onto a bike that’s too big for them? They sit on the seat and struggle to reach the pedals. Then they grab the handlebars and realise they can’t even touch the brake levers. Like a lot of things, cute when a kid does it but puzzling for an adult. Did you even know that your bike brake levers can be adjusted  to suit your natural grip position and the size of your hands?
This is one of those little things that can make such a huge difference to your time on the bike. We love comfort and want you to be as comfortable as possible. Braking is an important part of what we do when we ride so you should feel that when you break it is a natural movement that ends with your fingers and hands in a strong place. Let me explain further as there are two things going on here. When you grip your handlebars and place your fingers onto the brake lever to prepare for braking…
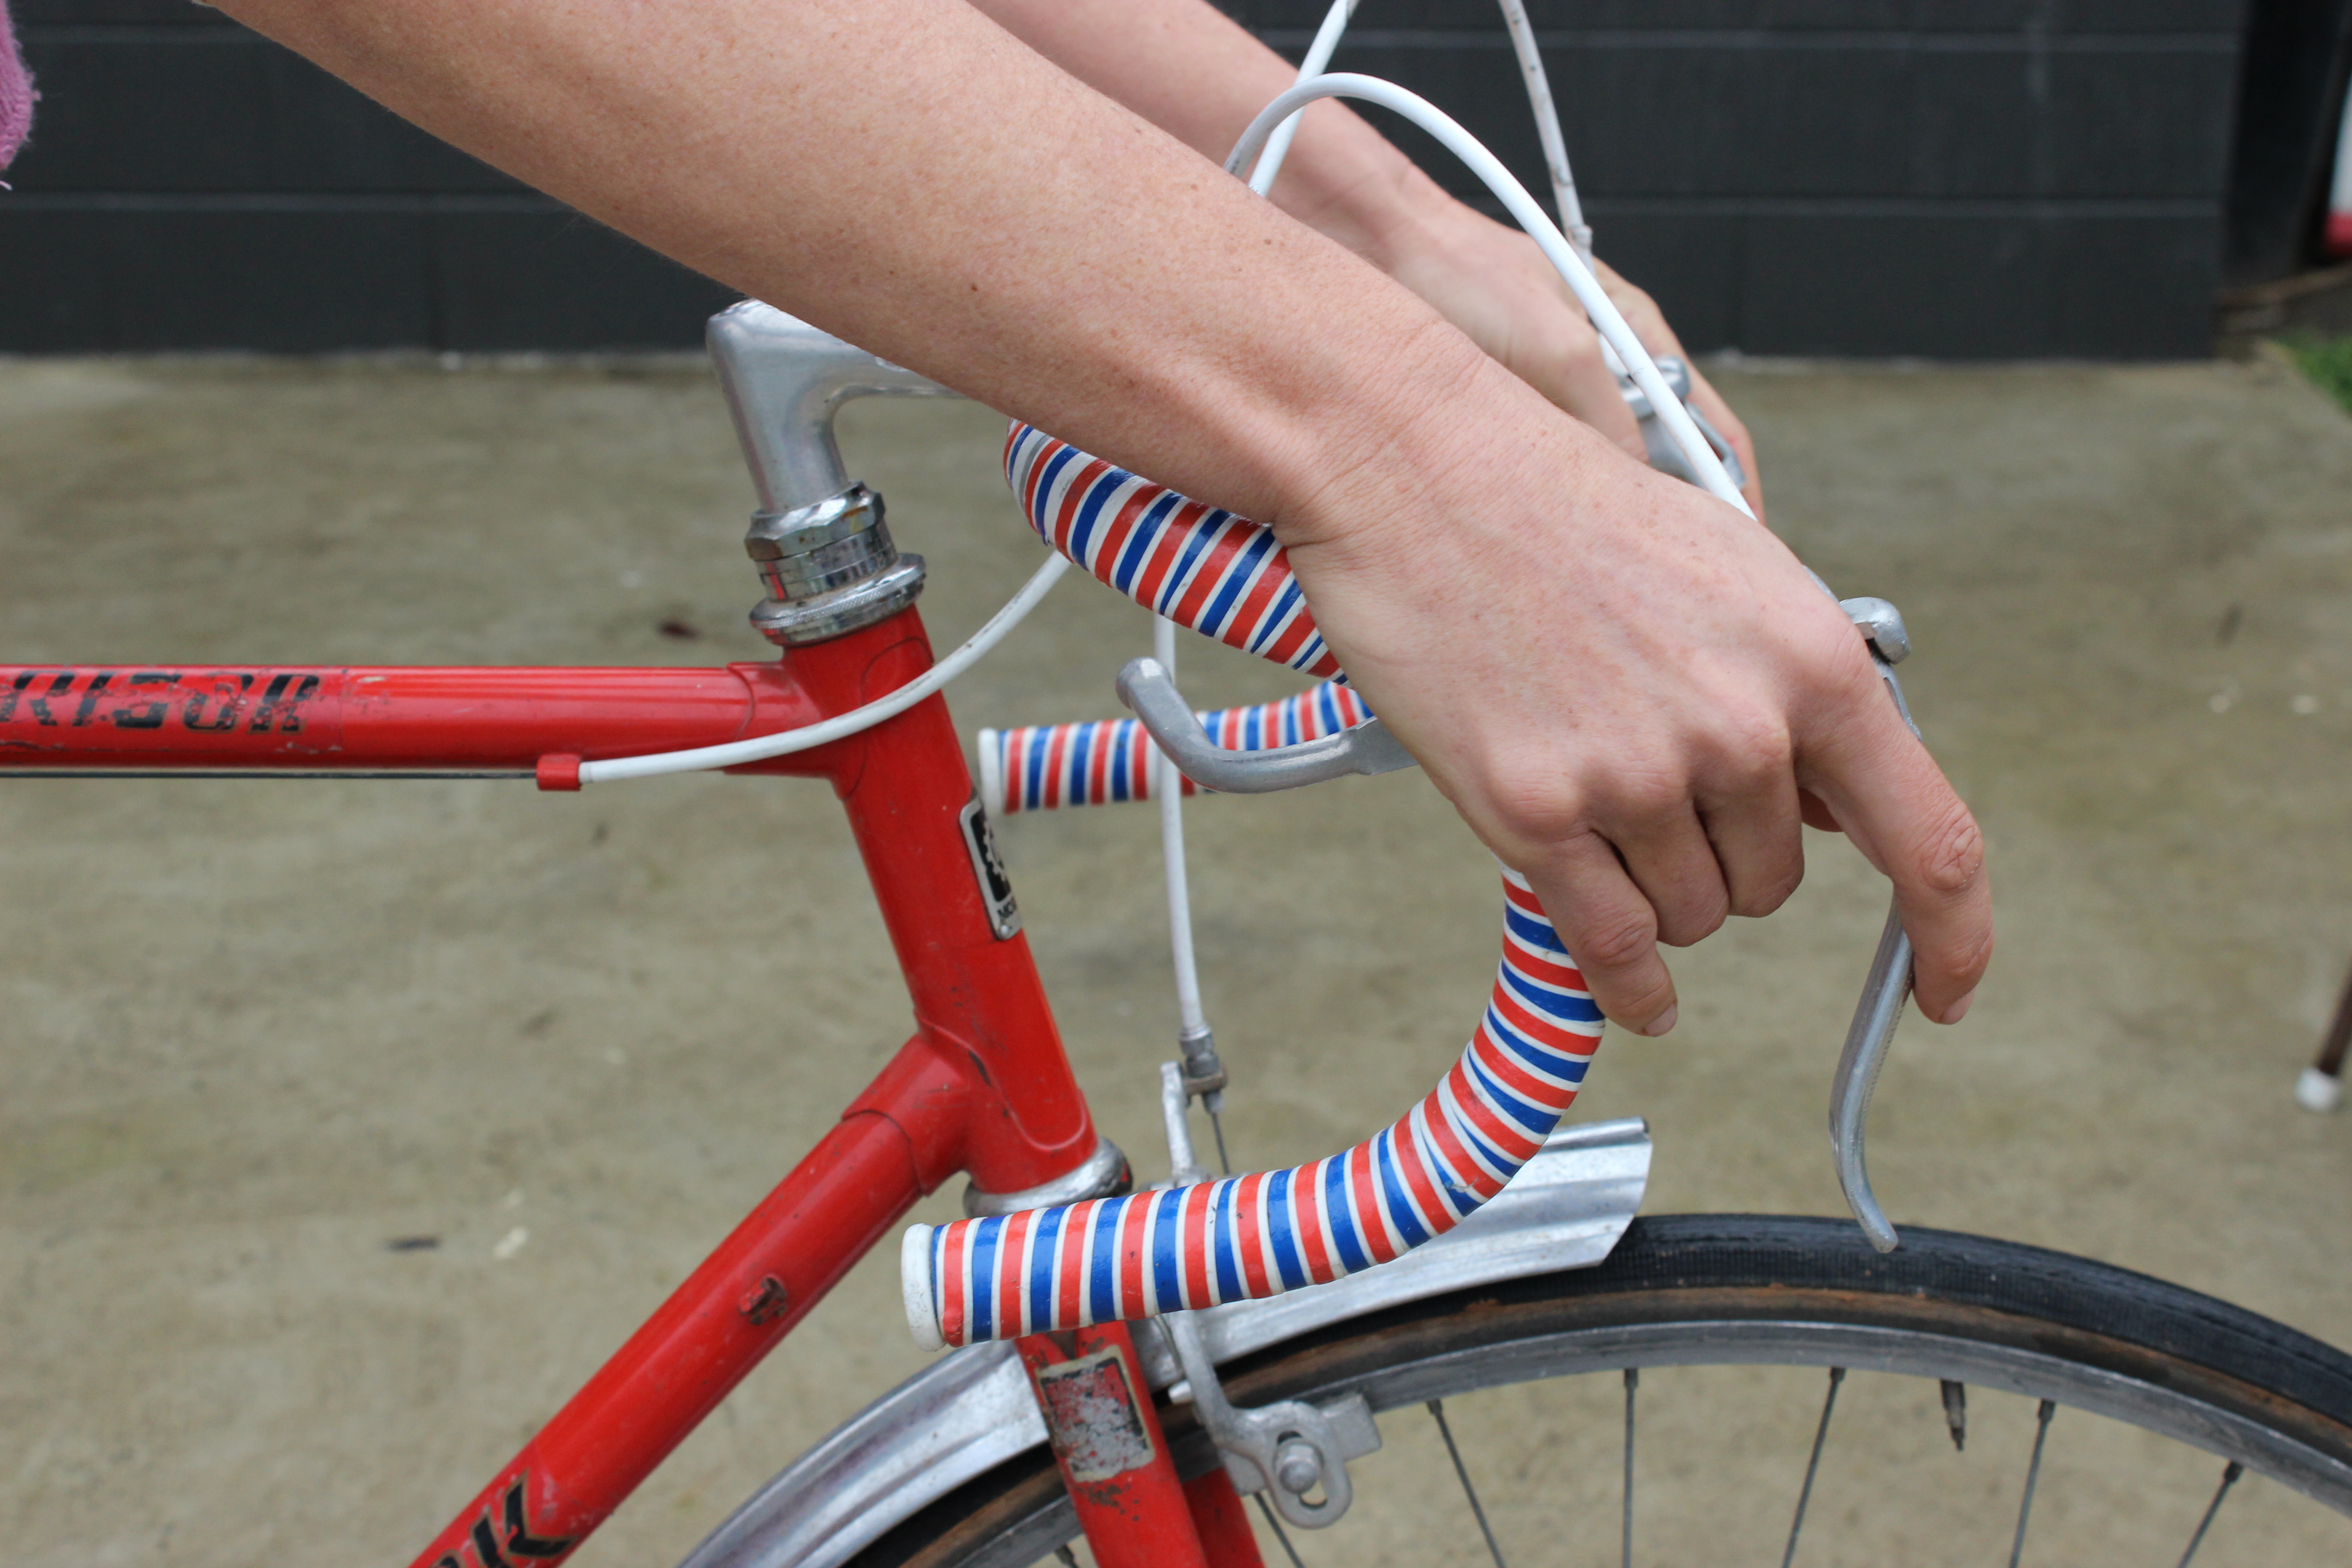
- Your wrist should be in a natural relaxed position like the photos below. Let’s think about how your wrist moves. It moves in 2 ways. Up/down and left/right, with a combination of these movements giving you a circular motion. When you are sitting on your bike seat gripping your handlebars look at your wrists then in your mind draw a straight line beginning half way along your wrist, continuing through your hand and ending with the one or two fingers you have resting on your brake lever. Trouble happens when you have to move your hand to the left or right to get your fingers on the levers creating a sideways bend (left/right movement) at the wrist joint. This can happen on both a mountain bike or road bike – same movement your wrist is just in a different place. The other thing to watch for is bending up or down at your wrist joint which will happen it your brake levers are too high or to low.
- Your fingers need to be relaxed and light just like your hand grip, you shouldn’t feel like you are stretching or really have to make an effort to touch your brake levers. The other extreme applies as well – if your brake levers are too close. This will make it difficult to have good strength when you pull on the lever as you run out of movement in your fingers and space to pull further.

Drop bar position showing good wrist alignment
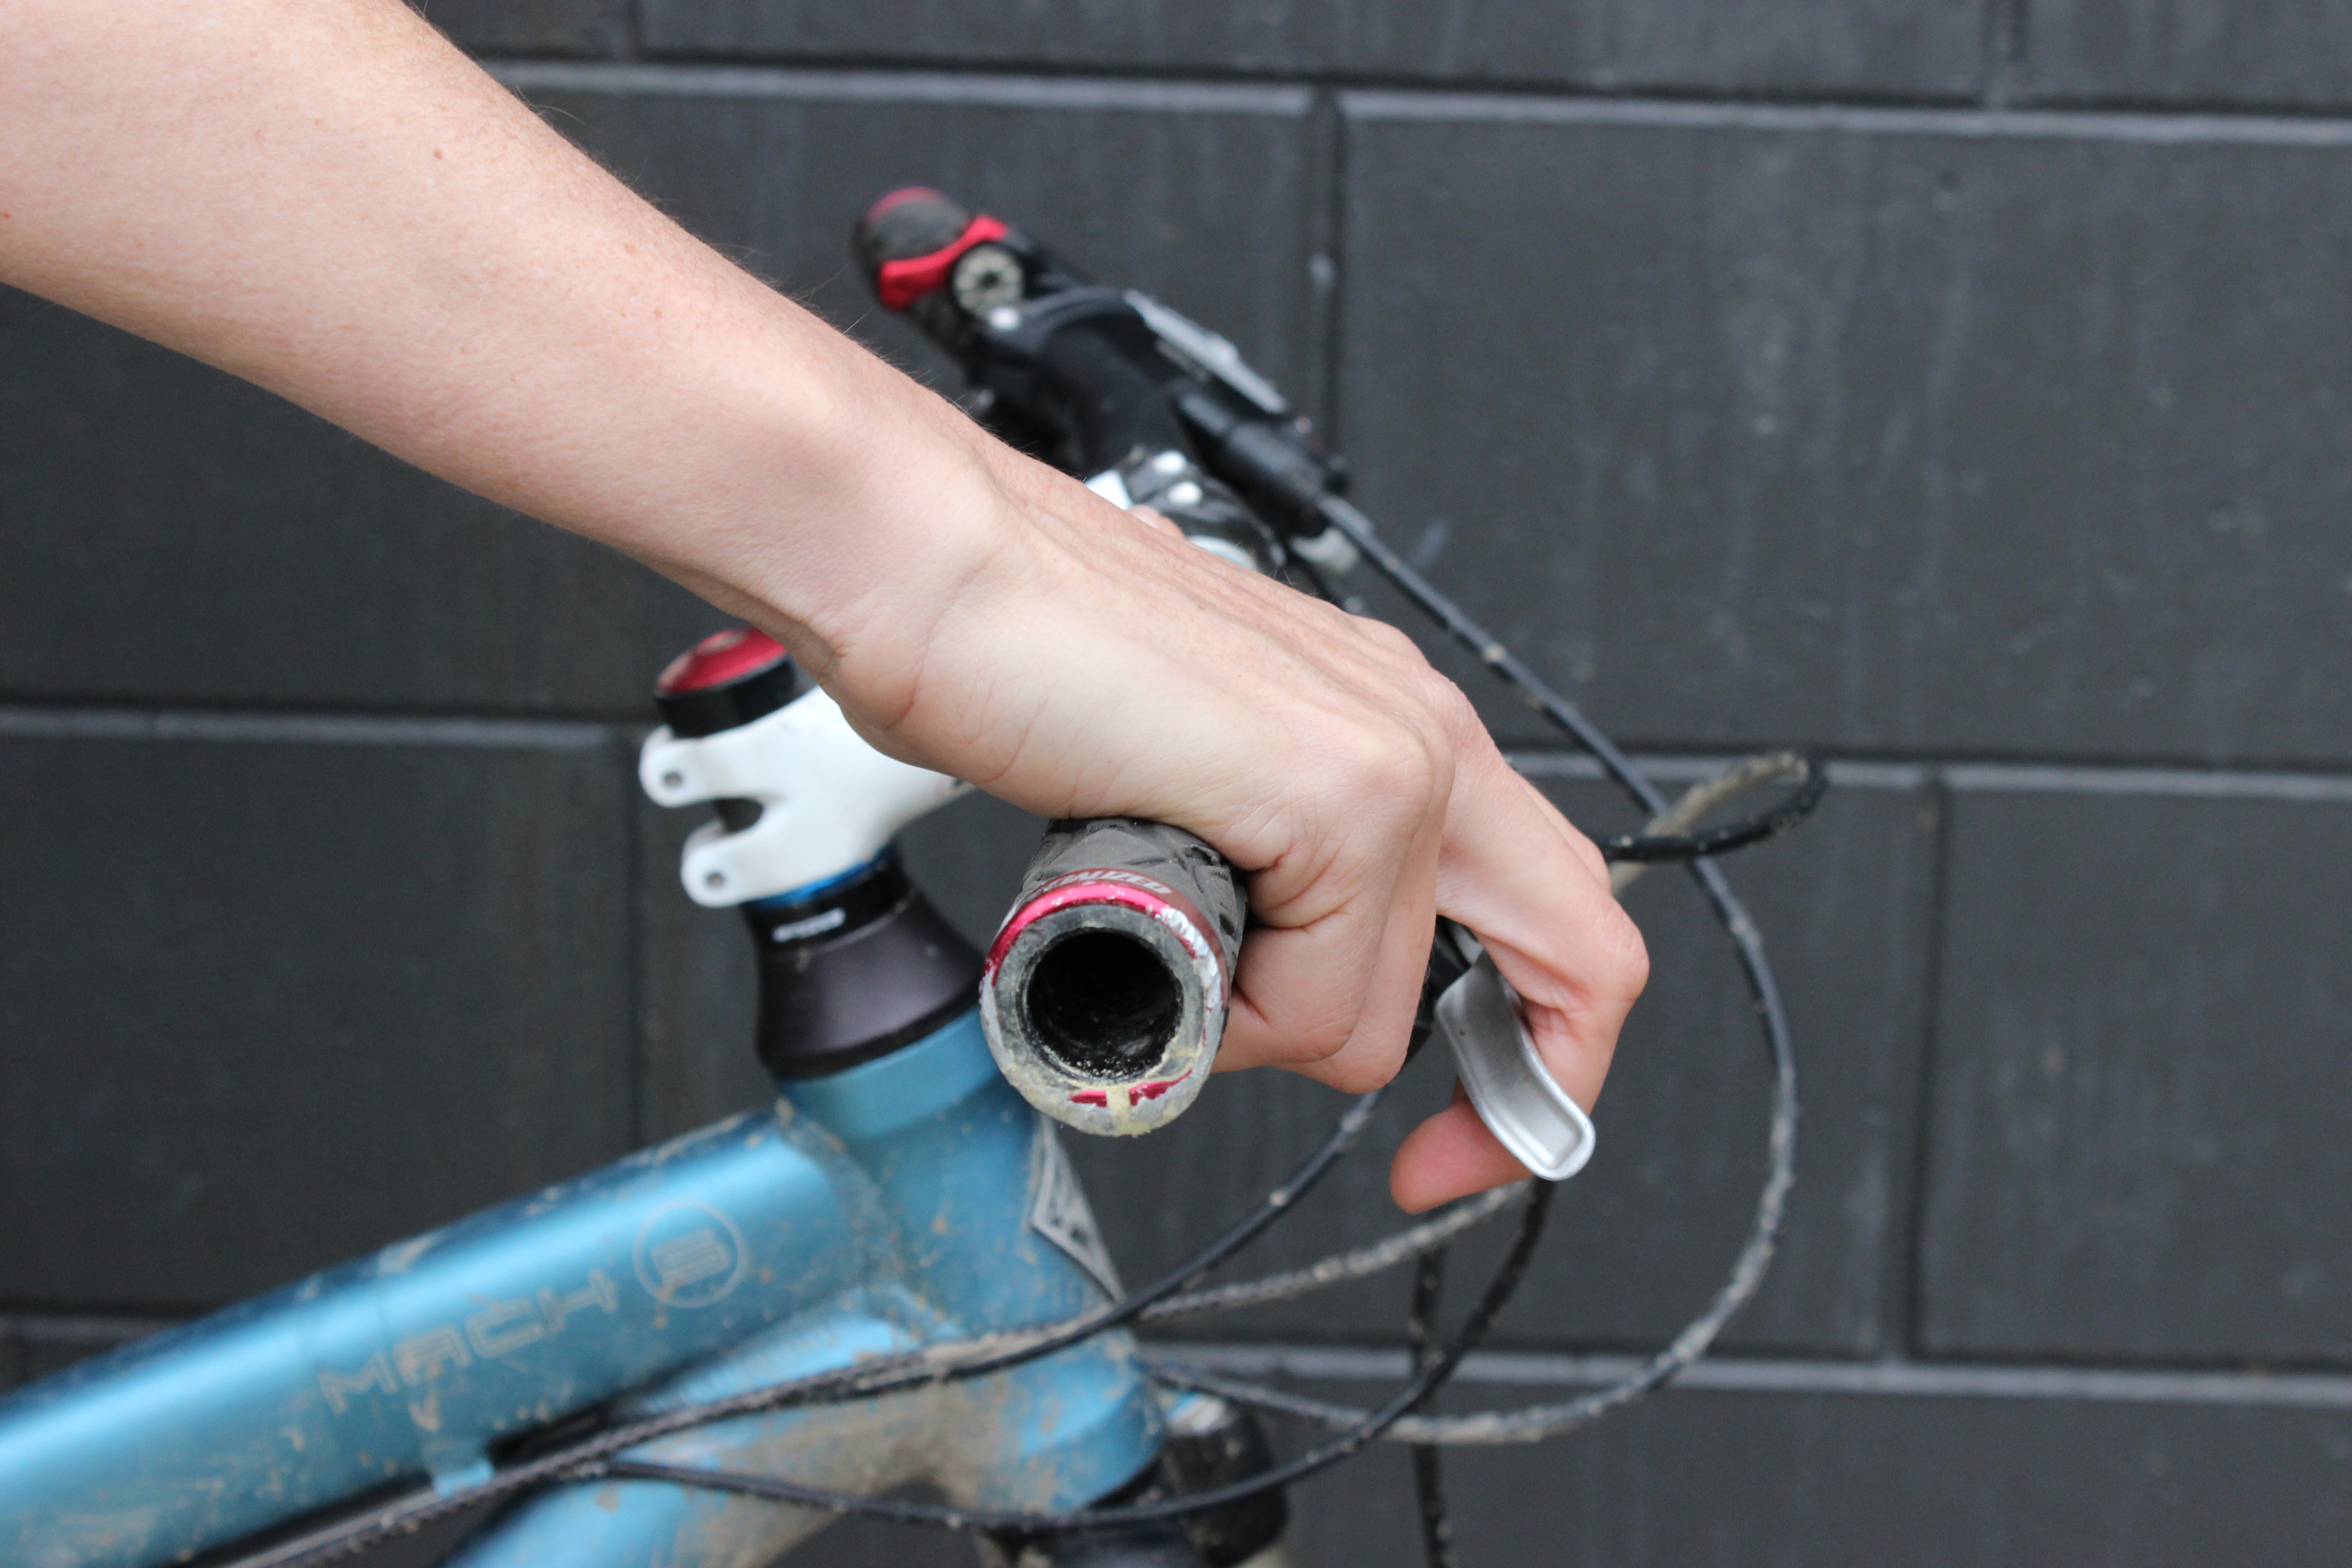
Brakes ON, shows good wrist and finger alignment
Why is this so important? When you grip your handlebars you tend to put your hands where they can reach the brake levers. This makes good sense and should be encouraged. However, if your brake levers are in the wrong place this will cause you to be doing something “wrong” with your wrist/hand/finger alignment. I’m going to remind you about the 3 points of contact on your bike – butt on seat, feet on pedals, hands on handlebars. So your hands are bearing weight and that weight transfer onto the bike needs to be in good alignment especially as you spend longer on your bike going more places, more often.
A GUIDE TO ADJUSTING YOUR BRAKE LEVERS
You have three possible outcomes here.
- One, you check your set up and need to do nothing.
- Two, you change either the position of your brake lever system on the handlebar or the brake lever reach (see note below).
- Three, you have to change both (see note below).
Please Note – Brake Tension: If you change the brake lever reach you will probably notice a change in the engagement of your brakes – how far in you have to pull them before they start to work. This will have to be adjusted if you think it has changed too much. If I’m starting to scare you and you don’t feel confident mucking around with your brakes but need your lever arm reach changed – GET SOME HELP. Find a friend who knows what they are doing or take your bike into your bike mechanic. If this sounds like something you want to learn about find a online video about adjusting brakes – make sure you enter the name of your brakes and type of bike to refine the search a little – good luck and good on you.
- Flat Bars/Riser Bars

 Where should the levers be? Most people find that approximately one inch in from the inside end of your grips gives the best hand placement, right in the middle of the grips. This is so your first two fingers are directly in line with the flat surface of the lever where you should be pulling. The distance/reach out from the handlebar depends on the length of your fingers – when relaxed your fingers should touch the lever just inside your end joint. People are different and so are their comfort levels – you need to feel confident in your ability to engage your brakes and feel that by the time your brake pads hit your wheel your wrist and fingers are feeling strong.
How to adjust the brake lever position; you will need an allen key or a screwdriver depending on how old your bike is and what type of bike you have. In the photos my bike has an allen screw so an allen key will loosen the clamp holding the whole brake system onto the handlebar (see the photos above, its the screw at the back). Once loosened you can slide it in or out to align the part of the brake lever you pull on with your first and second fingers. Then you can rotate it around the handlebar to get the comfortable relaxed line of your wrist and knuckles. Once adjusted you need to get up on your bike seat and check if all feels natural.
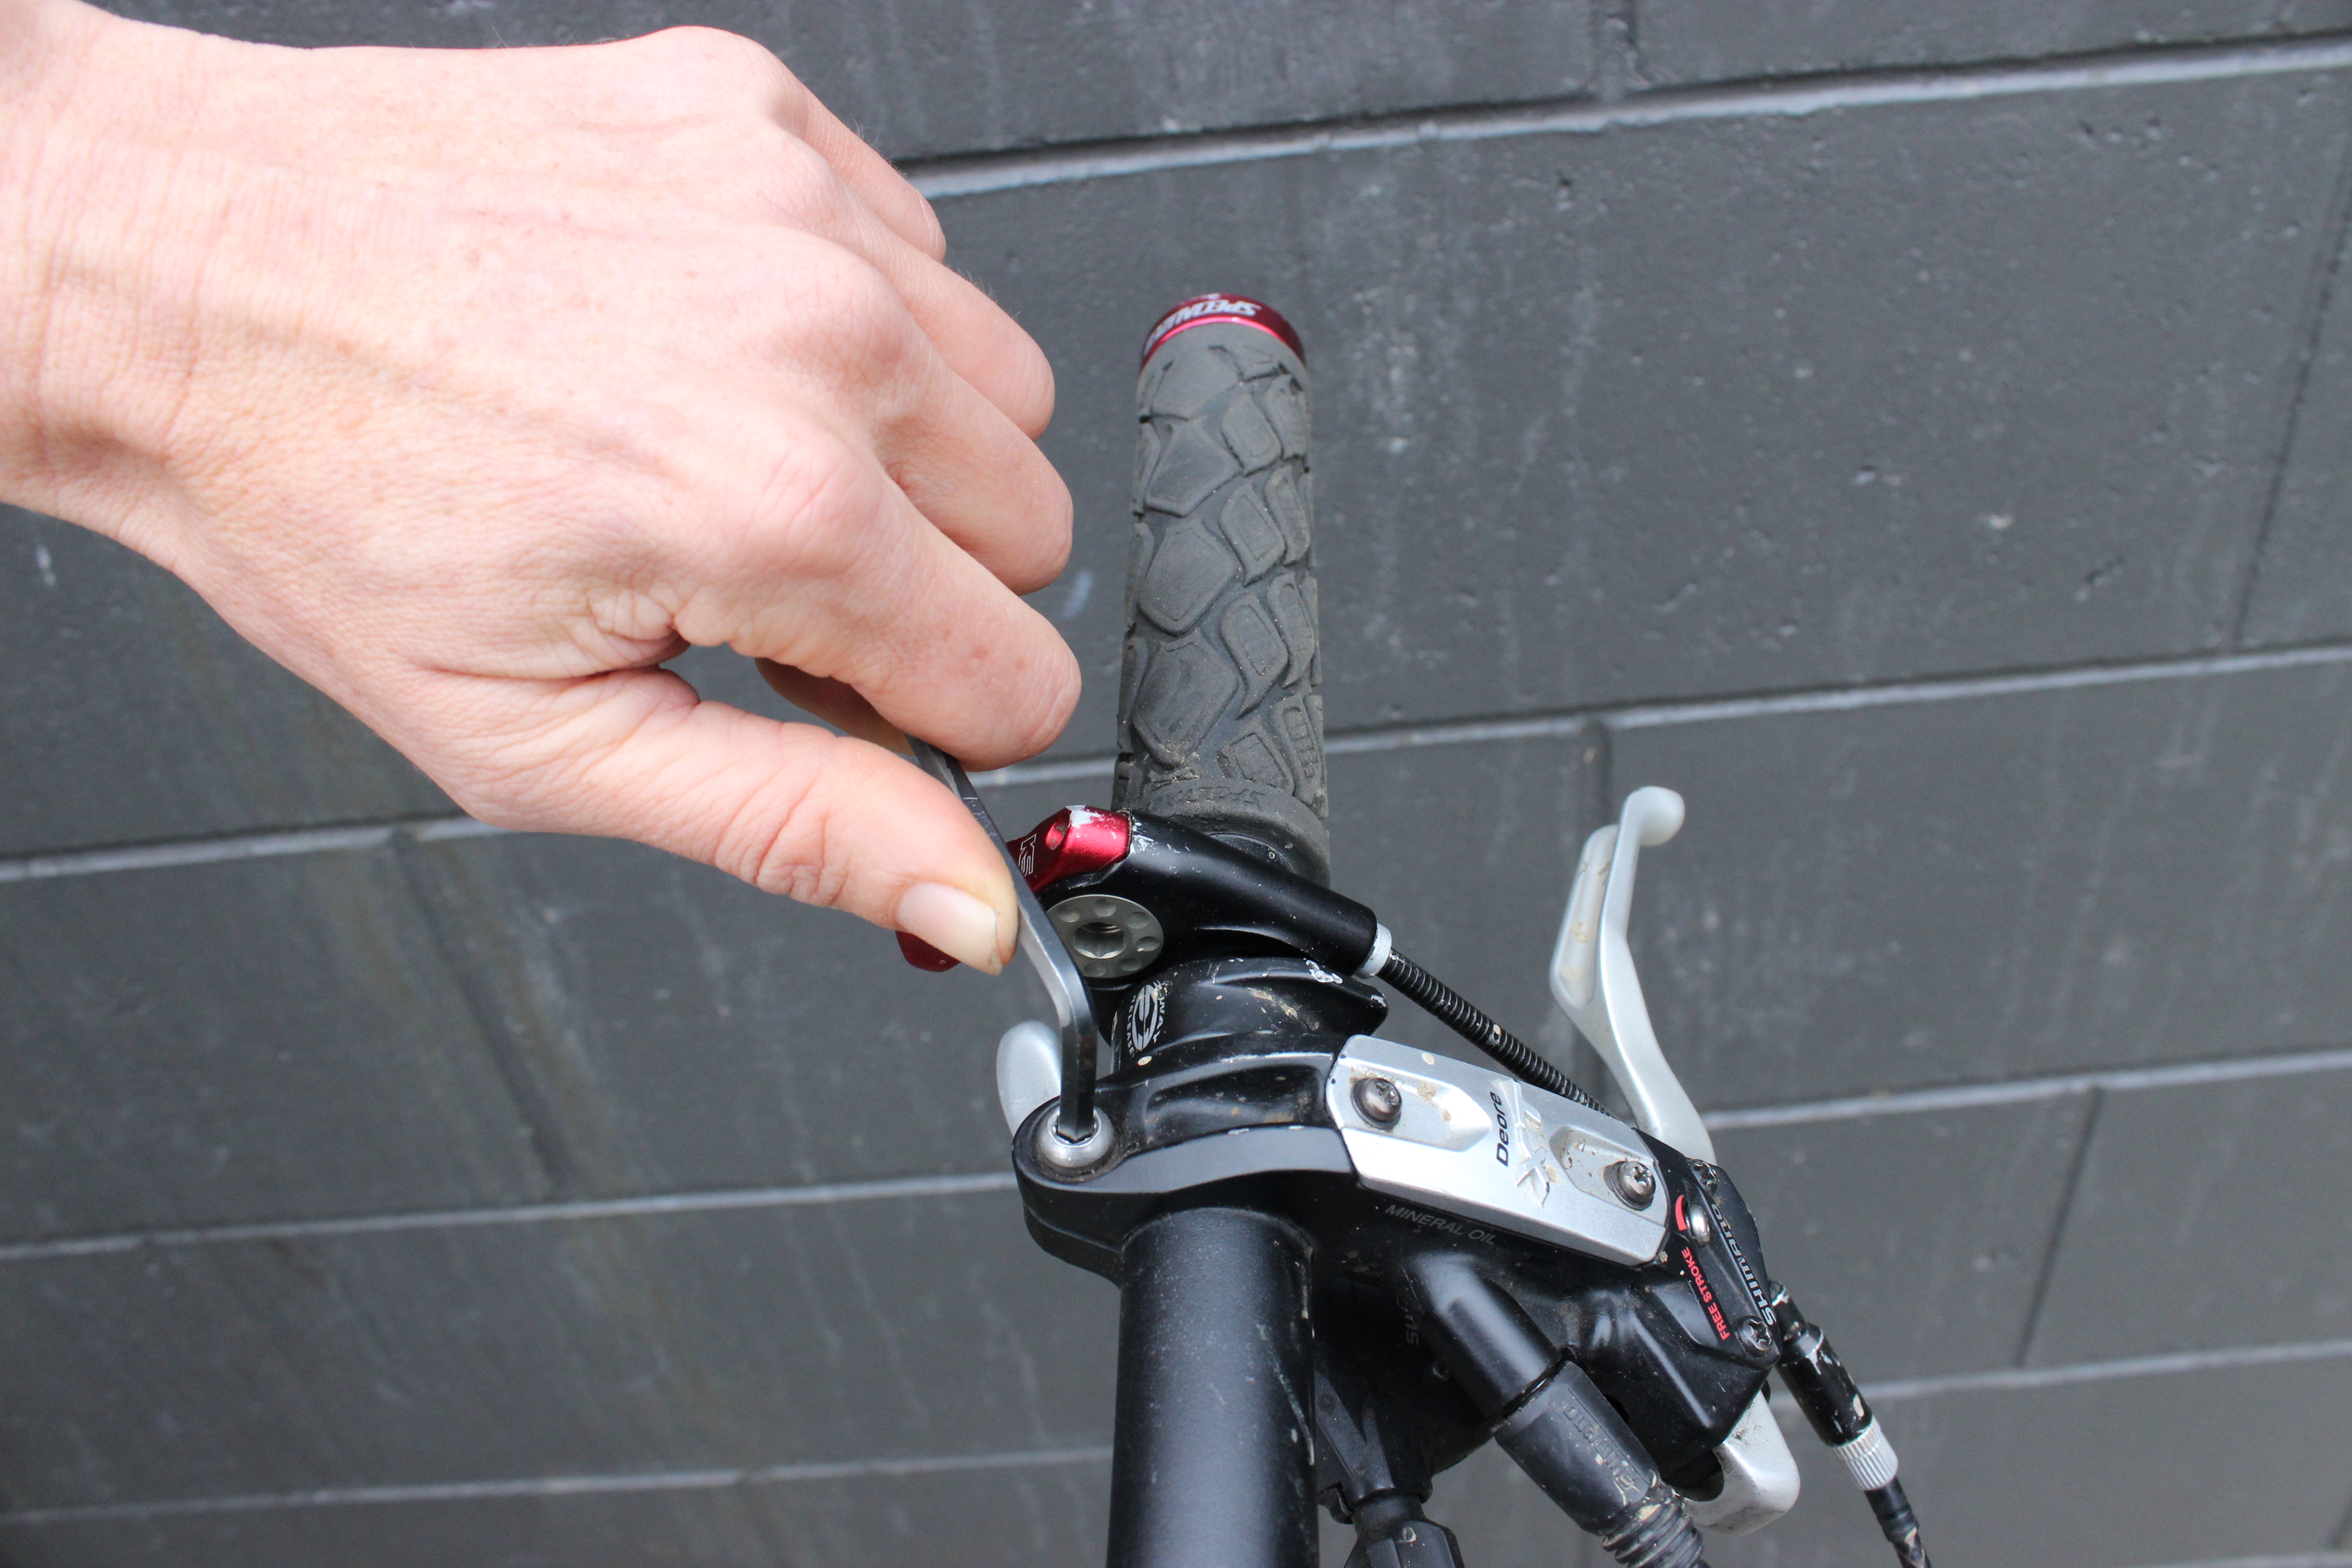
How to adjust the brake lever reach; (see above note for advice and this is not a quick job like the one above, you will need time). If you’re game to give this a try find an allen key or screwdriver depending on what your need. Locating the screw might not be simple. There are so many different types of braking systems out there. You are looking for the screw closest to the end of the lever arm. It may be underneath or inside or it may be a knob you need to twist (see all the photos below to give you an idea of what you should be looking for). Once you’ve worked this out, loosen the screw holding the lever in place (righty tighty, lefty loosey), shift the position of the lever arm then tighten it up again. Check out how it feels and where your finger joints are resting by getting up onto your bike. If it is all good and feels quite natural it’s in the right place! Now check that brake tension/engagement (if you haven’t already, read the note on brake tension above).
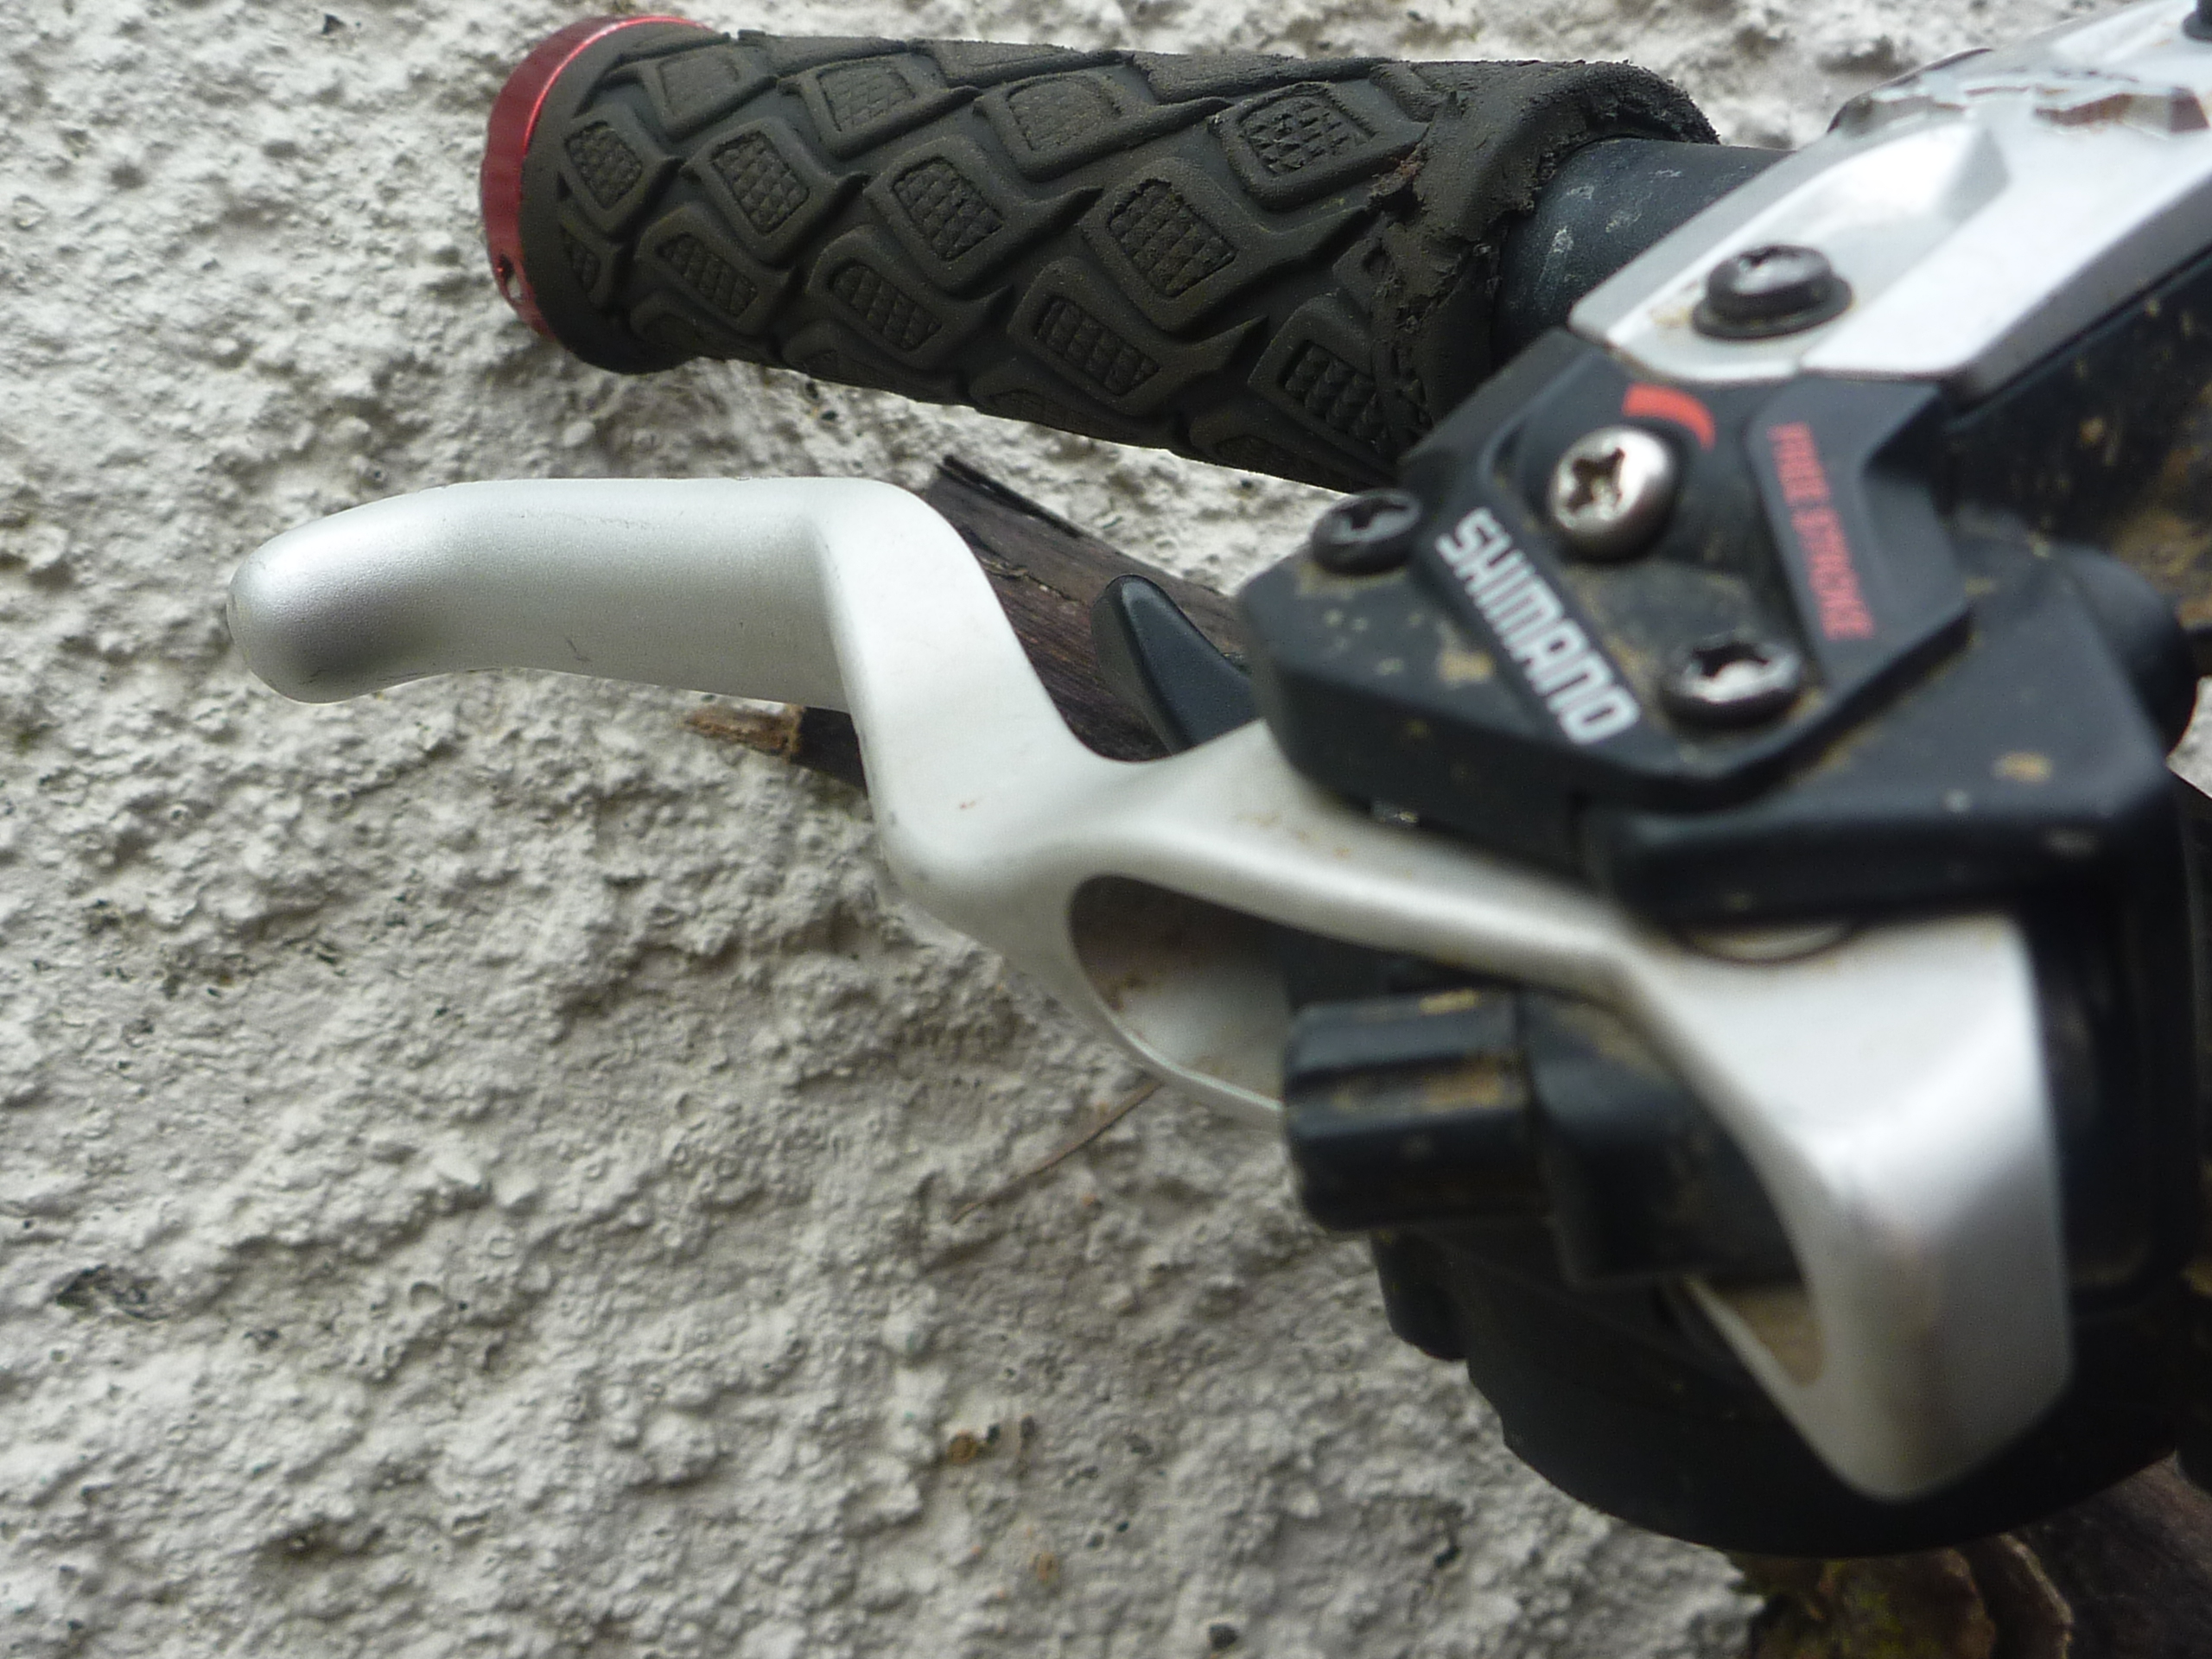
This series of photos shows you several options for the type of screw/knob you are looking for to adjust your reach.

Kids bike showing a grub screw that needs a small allen key.

This screw is on the inside and needs a small allen key.

Located on the outside at the end of the lever. Again small allen key needed.
These two photos show knobs or dials located on the outside at the end of the brake lever.

- Drop Bars
 Where should the levers be? When your first two fingers are extended but at rest ideally they should touch your lever arm around your finger tip or furthest away joint. People are different and so are their comfort levels – you need to feel confident in your ability to engage your brakes and feel that by the time your brake pads hit your wheel your fingers are in a strong position.
In this story I’m going to talk about the brakes you would use in the drop position and how to deal with reach. Adjusting position or height on drop bars effects your ability to use the hoods as a hand gripping position (see photo to left). Changing height like this is a bike fit topic and will be tackled in another series of stories.
Generally to get comfortable with braking on drop bars you need normal to long fingers so if your fingers fall into the short category you may have to deal with levers that are positioned at your finger tips. Pay particular attention to the height of the whole brake system if this is the case (sliding the whole system up or down on the handlebar could put the brake lever in a better place for your fingers but be aware of bike fit as discussed above). If you are uncomfortable with “getting used” to this stretch, consider replacing your current set up with a junior size brake system (this may effect your gear changing set up if it is currently a part of the brake system). Another more expensive option is replacing your whole handlebar. Bontrager VR-S bars are recommended for small hands.
 How to adjust; I wish this was an easy push the button to the left or right… Removing the hood, black rubber casing over the top of your brake system, will let you know if you’re one of the lucky one’s with this option. You are looking for a little pin or screw that allows you to do this (see note above about brake tension). If its already on the shortest option the next step could be “shims” or little pieces of black plastic. You need to get along to your bike mechanic and talk to them about what you want to do – shims are generally not available for retail sale.
You should be relaxed and confident about your ability to brake efficiently on your bike. Aim to be natural and relaxed even with women sized hands!!
[themeone_section type=”full-width” bgcolor=”#fafafa” txtcolor=”dark” decotop=”” decobot=””]
Thanks for reading. Used together our stories and resources support you to achieve and develop as a rider.
goRide is a shared journey, so we would like you to assist in guiding it along the way. Contact goRide. Your thoughts, comments or feedback are welcome. Thank you for being a part of the goRide way.[/themeone_section]
Women
Padded Bike Underwear
Pants for Biking
Tops for Biking
Jackets & Over Trousers for Biking
Riding Clothing for Larger Sizes
Warmth Accessories
Bike Saddles
Bike Helmets
Mountain Bike Helmets
Bike Gloves
Protective Padding
Bike Bells
Hydration
Handlebar Grips
Kids & Youth
Padded Bike Underwear
Bike Helmets
Mountain Bike Helmets
Riding Clothing
Jackets for Biking/Outdoors
Protective Padding
Bike Gloves
Bike Lights
Bike Bells
Handlebar Grips
Bike Saddle
Bike Locks
Hydration
Family
Ride with a baby/ 1 year old
Ride with a 2-6 year old
Ride with a 4 + year old – on their own bike
Full Range Kids Bike Seats – Attached or Towed
Create a Family Biking Holiday
Ride More Places with Kids
Men
Padded Bike Underwear
Bike Helmets
Mountain Bike Helmets
Bike Saddles
Bike Tops,Jackets & Over Trousers
Bike Gloves
Protective Padding
Handlebar Grips
Bike Bell
Be comfortable & confident
Successfully Ride an E-Bike
Beginner Rider
Heavy Riders – Enjoy Biking
Be Comfortable on your Bike Seat
Riding in Cooler Weather
Riding in Wet Conditions
Be Visible on the Bike
Enjoy a Biking Holiday
‘Fun Up’ the Kids Bike/Biking
goUnders- Padded Bike Underwear
Women, Mens, Youth & Kids

SHOP goUnders.
Clothing & Bags
Padded Bike Pants & Underwear
Pants & Shorts for Biking
Bike Tops
Bike Jackets
Over Trousers for Biking
Headbands & Neck Warmers for Biking
Bags, Baskets & Panniers for Biking
Rider Safety & Protection
Bike Helmets
Mountain Bike Helmets
Bike Gloves
Protective Padding
Bike Lights
Bike Bells
First Aid & Personal Care
Hydration
Bike Tow Ropes
Bike Parts & Care
Bike Saddles
Handlebar Grips
Bike Locks
Bike Carriers
Bike & Chain Cleaning
Bike Tools & Tool Kits to Carry
Kids Bike Seats & Bikes
Rear Kids Bike Seats
Mid Kids Bike Seats
Front Kids Bike Seats
Towing Kids who ride their own Bike
Bike Trailers for Kids
Kids Balance Bikes
HIRE Kids Bike Seats
Be Comfortable & Confident
Comfort on your Bike Seat
Be Visible on the Bike
Beginner Riders
Get Started – Ride with a baby
Heavy Riders – Enjoy Biking
Riding in Cooler Weather
Riding in Wet Conditions
‘Fun Up’ the Kids Bike/Biking
Bike Path Riding
Beginner to Fitness
Multi-Day
With Kids of all Ages
Kids Riding Bikepaths
Multi-Day with Kids
Bike Path Riding Guide
Ride more Bikepaths
Mountain Biking
Women Beginner to Intermediate
Men Beginner to Intermediate
Multi-Day
With Kids of all ages
Kids Mountain Biking
Multi-Day with Kids
Mountain Biking Guide
Ride more Mountain Bike Trails
Riding in Traffic
Be Visible in Traffic
Commuting
With Kids of all Ages
Kids Riding in Traffic
E – Biking
E-Biking in Traffic
E-Biking on Bikepaths
E-Biking on MTB Trails
A Biking Holiday
E-Biking Guide
Multi-Day Riding
Multi-Day on Bike Paths
Multi-Day on MTB Trails
Multi-Day with Kids on Bike Paths
Multi-Day with Kids on MTB Trails
Multi-Day Guide
A Biking Holiday
Family Biking Holiday
Ride more Multi-Day Rides
Family Riding
Full Range Kids Bike Seats – Attached or Towed
On Bikepaths with Kids
MTB with Kids
In Traffic with Kids
Family Biking Holiday
Family Riding Guide
Ride More Places with Kids
Kids Attached or Towed Buying Guides
Rear Kids Bike Seat
Mid Mount Kids Bike Seat
Front Kids Bike Seat
Towing Kids who ride their own bikes
Kids Bike Trailers
Kids & Youth Buying Guides
Kids Bike Helmets
Kids Riding Clothing
Kids Padded Bike Pants
Kids Padded Protection
Kids Handlebar Grips
Kids Balance Bike
Comfort on the Bike Buying Guides
Womens Bike Saddle
Mens Bike Saddle
Padded Bike Pants
Bike Jackets
Carrying Gear
Handlebar Grip
Hydration
Rider Safety Buying Guides
Bike Helmet
Mountain Bike Helmet
Protective Padding
Be Visible
Bike Glove
Bike Light
Mountain Bike Light
First Aid & Personal Care
Gear & Care for Bikes Buying Guides
Bike Carriers
Bike Cleaning
Bike Locks
Chain Cleaning and Lube
goUnders- Padded Bike Underwear
Women, Mens, Youth & Kids
SHOP goUnders.
Women & Families Learning
Comfort on your Bike Seat
Clothing for Biking
Family Biking
Improve your Riding
Carrying Gear
Care for ‘you’
Care for your Bike
Ride More Places
Ride more Bikepaths
Ride more NZ Cycle Trails
Ride more Mountain Bike Trails
Ride more Multi-Day Rides
Ride more Places with Kids
Riding Gear
Bike Helmets
Bike Saddles
Padded Bike Underwear & Pants
Bike Gloves
Bike Jackets
Protective Padding
Bike Locks
Bike Lights
Bike Tools to Carry
Handlebar Grips
Bike and Chain Cleaning
Kids Bike Seats & Bikes
Kids Bike Trailer
Towing kids who ride their own bike
Rear Kids Bike Seats
Mid Mount Kids Bike Seats
Front Kids Bike Seats
Balance Bike
Types of Riding
Bikepath Riding
Family Riding
E-Bike Riding
goUnders- Padded Bike Underwear
Women, Mens, Youth & Kids
SHOP goUnders.