
[vc_row][vc_column][vc_row_inner][vc_column_inner width=”2/3″][themeone_spacer height=”41px”][vc_column_text]A broken or twisted chain link/s does not happen very often (especially if you care for your bike chain) but it can happen! If it does you will be unable to continue to ride your bike…so it could be a long walk home unless you have the tools and the skills to repair your bike chain.
Knowing you are carrying the tools and that you know how to use them to fix a broken or twisted bike chain link/s gives you confidence and helps you enjoy your ride.
Take a little bit of time to learn how to fix a broken or twisted chain. You can do it …have the confidence to give it a go – the freedom, the confidence it gives you – is worth it.
Choose to know what to do then you can goRide with a SMILE.[/vc_column_text][/vc_column_inner][vc_column_inner width=”1/3″][themeone_spacer height=”71px”][vc_btn title=”Bike Tool Buying Guide ” style=”flat” color=”violet” size=”lg” link=”url:https%3A%2F%2Fgoride-debugclone.mystagingwebsite.com%2Fportfolio%2Fbike-tool-buying-guide%2F||target:%20_blank|”][themeone_spacer height=”18px”][vc_btn title=”Shop Bike Tools” style=”flat” color=”warning” size=”lg” link=”url:https%3A%2F%2Fgoride-debugclone.mystagingwebsite.com%2Fbike-tools%2F||target:%20_blank|”][/vc_column_inner][/vc_row_inner][vc_column_text]
What is a broken and twisted chain?
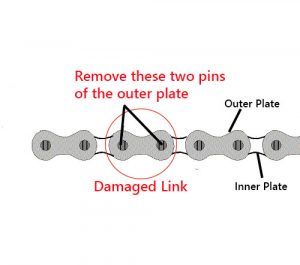
There will be damage to either one or a few of the chain links. The link or links may no longer be intact or they can become bent or twisted[/vc_column_text][vc_row_inner equal_height=”yes” to_equal_column=”equal_height”][vc_column_inner width=”2/12″][/vc_column_inner][vc_column_inner width=”5/12″][vc_single_image image=”6242″ img_size=”600 x 400″][vc_column_text]Understand what a bike chain and its links should look like. You can learn more at – Know your bike chain.[/vc_column_text][/vc_column_inner][vc_column_inner width=”3/12″][vc_single_image image=”17694″ img_size=”600 x 400″][vc_column_text]Damaged Bike Chain Link[/vc_column_text][/vc_column_inner][vc_column_inner width=”2/12″][/vc_column_inner][/vc_row_inner][vc_column_text]
 What bike tools do you need for the repair?
You will need a chain tool
A chain tool allows you to remove and reinsert pins/rivets from the bike chain so you can remove the damaged link/s. goRide has chosen a small lightweight tool that is easy to use and can be part of your carrying tool kit or your home tools depending on where you are riding. For more information See Bike Tools – The Chain Tool.[/vc_column_text][vc_column_text]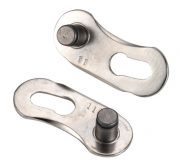 You will need a spare chain link
A spare chain link is a spare part that you carry to assist with repairing your bike chain. It is a spare outer link for your bike chain. This spare part needs to match the size of chain you have on your bike.
What speed of bike do you have? Count the number of sprockets in your rear cassette. This is the speed of your bike and you need a spare chain link to match. See know your bike chain for more details.
For example: I have a 10 speed bike (10 sprockets in my rear cassette) I need a 10 speed chain link
For more information see Bike Tools – A Spare Chain Link[/vc_column_text][themeone_spacer height=”41px”][/vc_column][/vc_row][vc_row css=”.vc_custom_1532034508461{background-color: #f2f2f2 !important;background-position: center !important;background-repeat: no-repeat !important;background-size: cover !important;}”][vc_column][themeone_spacer height=”15px”][vc_column_text]
How to do the repair?
Learn how to use your chain tool so you know you can always make it home. That has to make you SMILE. You will need to be able to identify the outer and inner links on your chain as well as the pins/rivets. See know your bike chain for more information
#1. Remove damaged link (or twisted link) and reconnect with a spare link that you are carrying.
 You need to remove the damaged outer link or links using your chain tool.
- Place the chain on the tool as shown below. Align the pins. (Note without correct alignment the pin will be challenging to remove)
- Rotate the lever pushing the pin out – continue until the pin is completely removed from the chain. The chain is now no longer a continuous loop. You will need to rotate the lever in the opposite direction to remove the tool from the chain.
- Repeat on the second pin so you completely remove the damaged link or links (this will mean you have completely removed 2 pins). You need an ‘inner’ plate at both ends of your bike chain (your spare chain link is an ‘outer’ plate).
- Make sure the chain is traveling along its correct path. You do not want too much tension in the chain making it too hard to reconnect. Popping the chain on the small chain ring at the front should help. See know your bike chain
- It is easiest to make the re-connection with the broken part of the chain at the top of the loop. Use your spare outer link to reconnect the chain. Pop one half of the spare link onto the inner link on one end of the chain. Repeat with the other half of the spare link onto the other end of the chain – now bring them together. The pins/rivets will fit into the larger circle. The chain link now needs to click into place. Use your hands to pull apart. If it does not click into place…
- Engage the back brakes with your right hand and push down on the pedal this should snap the link into place.
The major benefit of using the spare link is that this does not shorten the length of the chain so all gears can continue to be used for the ride home. The repair is also a lot easier as the pins can be completely removed from the chain.
Note: sometimes you may have a chain that has more than 1 link damaged or twisted. You will need to remove all the damaged parts and then use the spare link. You will have a shortened chain and this will limit the gears that you can use for the ride home. Avoid the chain being on the largest sprockets and chain rings.[/vc_column_text][vc_row_inner][vc_column_inner width=”1/4″][vc_single_image image=”17444″ img_size=”600 x 400″][vc_column_text]Place the chain onto the tool and align the pin on the chain tool with the pin on your bike chain. Rotate the lever until you push the pin on the bike chain completely out. Now retract the pin of the chain tool by rotating the lever in the opposite direction to remove the chain tool.[/vc_column_text][/vc_column_inner][vc_column_inner width=”1/4″][vc_single_image image=”17443″ img_size=”600 x 400″][vc_column_text]Repeat to remove the other pin of the damaged link. You should be left with 2 inner links. Repair the bike chain using your spare link.[/vc_column_text][/vc_column_inner][vc_column_inner width=”1/4″][vc_single_image image=”17084″ img_size=”600 x 400″][vc_column_text]Make sure the chain is travelling along its correct path. Position the chain so the repair can be made on the top of the loop and with little tension in the chain (place the chain on the smallest chain ring)[/vc_column_text][/vc_column_inner][vc_column_inner width=”1/4″][vc_single_image image=”17966″ img_size=”600 x 400″][vc_column_text]Insert the spare link. Pull apart with your hands to click into place. If difficult apply the back brakes with your right hand and push down on the pedal.[/vc_column_text][/vc_column_inner][/vc_row_inner][vc_column_text]
#2. Remove the damage link (or twisted link) and reconnect the chain using an existing pin/rivet
 This is your last resort option for repairing a chain. The above method is recommended but it is important to know how to repair your chain if you do not have access to a spare link.
Remove the damaged links using your chain tool. This time you need to be left with, at one end of your chain an inner plate, and at the other end an outer plate. The outer plate still needs to have its rivet/pin attached. You are going to reinsert this pin/rivet to reconnect the chain.
To do this – when removing the final pin/rivet you are not going to push the pin/rivet completely out. You want it to remain in the outer link.
Make sure the chain is traveling along its correct path on the bike. See know your bike chain for details. Then reconnect the chain by using your chain tool to reinsert the pin/rivet to a depth that matches the other pins.
Because you have removed links of your chain, and not replaced them, your chain will be shorter. You will need to avoid gears that are on the larger cogs at the rear and the larger chain rings at the front for the ride home.
This is a temporary fix and your chain should be replaced with a new chain at home before your next ride.
Note: sometimes you may have a chain that has more than 1 link damaged or twisted. You will need to remove all the damaged parts and repeat using either method above. You will have a shortened chain and this will limit the gears that you can use for the ride home.[/vc_column_text][vc_row_inner][vc_column_inner width=”1/4″][vc_single_image image=”17444″ img_size=”600 x 400″][vc_column_text]Place the chain onto the tool and align the pin on the chain tool with the pin on your bike chain[/vc_column_text][/vc_column_inner][vc_column_inner width=”1/4″][vc_single_image image=”17442″ img_size=”600 x 400″][vc_column_text]Remove the damaged link. On the second pin only push out the pin until it still remains in the outer link. You should be left with an inner link and an outer link with the pin still inserted in the outer link[/vc_column_text][/vc_column_inner][vc_column_inner width=”1/4″][vc_single_image image=”17084″ img_size=”600 x 400″][vc_column_text]Make sure the chain is travelling along its correct path. Position the chain so the repair can be made on the top of the loop and with little tension in the chain (place the chain on the smallest chain ring)[/vc_column_text][/vc_column_inner][vc_column_inner width=”1/4″][vc_single_image image=”17909″ img_size=”600 x 400″][vc_column_text]Reconnect the chain and use the chain tool to re-insert the pin.[/vc_column_text][/vc_column_inner][/vc_row_inner][themeone_spacer height=”15px”][/vc_column][/vc_row][vc_row][vc_column][themeone_spacer height=”15px”][vc_column_text]
Why does your chain break or twist?
There are a number of reasons why your chain might get broken or twisted. Mainly it is because the mechanics of your bike are not working quite right. Deraileurs not correctly aligned, the chain has slipped off and got stuck and needs force to free it, worn chain and sprockets that don’t change gears well.[/vc_column_text][themeone_spacer height=”41px”][/vc_column][/vc_row][vc_row css=”.vc_custom_1530830800826{background-color: #ed6521 !important;background-position: center !important;background-repeat: no-repeat !important;background-size: cover !important;}”][vc_column delay=”0ms”][themeone_spacer height=”14px”][vc_column_text]
get Better and goRide – Bike Repair – How to fix a broken or twisted bike chain
[/vc_column_text][themeone_spacer height=”14px”][/vc_column][/vc_row][vc_row][vc_column][themeone_spacer height=”41px”][/vc_column][/vc_row][vc_row css=”.vc_custom_1503562855007{background-color: #f1f1f1 !important;background-position: center !important;background-repeat: no-repeat !important;background-size: cover !important;}”][vc_column delay=”0ms” css=”.vc_custom_1500957776454{background-color: #f1f1f1 !important;background-position: center !important;background-repeat: no-repeat !important;background-size: cover !important;}”][themeone_spacer height=”20px”][vc_column_text]
Thanks for reading. Used together our stories, resources & products support you to achieve and develop as a rider.
Related Resources:
Bike Tool – A spare chain link
goRide helps you find your riding SMILE. Now it’s your turn….Contact goRide. Your thoughts, comments or feedback will make us SMILE.
[/vc_column_text][/vc_column][/vc_row][vc_row][vc_column][themeone_spacer height=”41px”][vc_column_text]
Other resources to help make you SMILE when you goRide
[/vc_column_text][/vc_column][/vc_row][vc_row][vc_column width=”1/4″][vc_single_image image=”13955″ img_size=”600 x 400″ alignment=”center” onclick=”custom_link” img_link_target=”_blank” link=”https://www.goride.co.nz/bike-topics/women-learning-bike/”][/vc_column][vc_column width=”1/4″][vc_single_image image=”13956″ img_size=”600 x 400″ alignment=”center” onclick=”custom_link” img_link_target=”_blank” link=”https://www.goride.co.nz/bike-topics/types-of-riders/”][/vc_column][vc_column width=”1/4″][vc_single_image image=”11960″ img_size=”600 x 400″ alignment=”center” onclick=”custom_link” img_link_target=”_blank” link=”https://www.goride.co.nz/bike-topics/riding-gear/”][/vc_column][vc_column width=”1/4″][vc_single_image image=”13957″ img_size=”600 x 400″ alignment=”center” onclick=”custom_link” img_link_target=”_blank” link=”https://www.goride.co.nz/bike-topics/places-to-ride/”][/vc_column][/vc_row]
Women
Padded Bike Underwear
Pants for Biking
Tops for Biking
Jackets & Over Trousers for Biking
Riding Clothing for Larger Sizes
Warmth Accessories
Bike Saddles
Bike Helmets
Mountain Bike Helmets
Bike Gloves
Protective Padding
Bike Bells
Hydration
Handlebar Grips
Kids & Youth
Padded Bike Underwear
Bike Helmets
Mountain Bike Helmets
Riding Clothing
Jackets for Biking/Outdoors
Protective Padding
Bike Gloves
Bike Lights
Bike Bells
Handlebar Grips
Bike Saddle
Bike Locks
Hydration
Family
Ride with a baby/ 1 year old
Ride with a 2-6 year old
Ride with a 4 + year old – on their own bike
Full Range Kids Bike Seats – Attached or Towed
Create a Family Biking Holiday
Ride More Places with Kids
Men
Padded Bike Underwear
Bike Helmets
Mountain Bike Helmets
Bike Saddles
Bike Tops,Jackets & Over Trousers
Bike Gloves
Protective Padding
Handlebar Grips
Bike Bell
Be comfortable & confident
Successfully Ride an E-Bike
Beginner Rider
Heavy Riders – Enjoy Biking
Be Comfortable on your Bike Seat
Riding in Cooler Weather
Riding in Wet Conditions
Be Visible on the Bike
Enjoy a Biking Holiday
‘Fun Up’ the Kids Bike/Biking
goUnders- Padded Bike Underwear
Women, Mens, Youth & Kids

SHOP goUnders.
Clothing & Bags
Padded Bike Pants & Underwear
Pants & Shorts for Biking
Bike Tops
Bike Jackets
Over Trousers for Biking
Headbands & Neck Warmers for Biking
Bags, Baskets & Panniers for Biking
Rider Safety & Protection
Bike Helmets
Mountain Bike Helmets
Bike Gloves
Protective Padding
Bike Lights
Bike Bells
First Aid & Personal Care
Hydration
Bike Tow Ropes
Bike Parts & Care
Bike Saddles
Handlebar Grips
Bike Locks
Bike Carriers
Bike & Chain Cleaning
Bike Tools & Tool Kits to Carry
Kids Bike Seats & Bikes
Rear Kids Bike Seats
Mid Kids Bike Seats
Front Kids Bike Seats
Towing Kids who ride their own Bike
Bike Trailers for Kids
Kids Balance Bikes
HIRE Kids Bike Seats
Be Comfortable & Confident
Comfort on your Bike Seat
Be Visible on the Bike
Beginner Riders
Get Started – Ride with a baby
Heavy Riders – Enjoy Biking
Riding in Cooler Weather
Riding in Wet Conditions
‘Fun Up’ the Kids Bike/Biking
Bike Path Riding
Beginner to Fitness
Multi-Day
With Kids of all Ages
Kids Riding Bikepaths
Multi-Day with Kids
Bike Path Riding Guide
Ride more Bikepaths
Mountain Biking
Women Beginner to Intermediate
Men Beginner to Intermediate
Multi-Day
With Kids of all ages
Kids Mountain Biking
Multi-Day with Kids
Mountain Biking Guide
Ride more Mountain Bike Trails
Riding in Traffic
Be Visible in Traffic
Commuting
With Kids of all Ages
Kids Riding in Traffic
E – Biking
E-Biking in Traffic
E-Biking on Bikepaths
E-Biking on MTB Trails
A Biking Holiday
E-Biking Guide
Multi-Day Riding
Multi-Day on Bike Paths
Multi-Day on MTB Trails
Multi-Day with Kids on Bike Paths
Multi-Day with Kids on MTB Trails
Multi-Day Guide
A Biking Holiday
Family Biking Holiday
Ride more Multi-Day Rides
Family Riding
Full Range Kids Bike Seats – Attached or Towed
On Bikepaths with Kids
MTB with Kids
In Traffic with Kids
Family Biking Holiday
Family Riding Guide
Ride More Places with Kids
Kids Attached or Towed Buying Guides
Rear Kids Bike Seat
Mid Mount Kids Bike Seat
Front Kids Bike Seat
Towing Kids who ride their own bikes
Kids Bike Trailers
Kids & Youth Buying Guides
Kids Bike Helmets
Kids Riding Clothing
Kids Padded Bike Pants
Kids Padded Protection
Kids Handlebar Grips
Kids Balance Bike
Comfort on the Bike Buying Guides
Womens Bike Saddle
Mens Bike Saddle
Padded Bike Pants
Bike Jackets
Carrying Gear
Handlebar Grip
Hydration
Rider Safety Buying Guides
Bike Helmet
Mountain Bike Helmet
Protective Padding
Be Visible
Bike Glove
Bike Light
Mountain Bike Light
First Aid & Personal Care
Gear & Care for Bikes Buying Guides
Bike Carriers
Bike Cleaning
Bike Locks
Chain Cleaning and Lube
goUnders- Padded Bike Underwear
Women, Mens, Youth & Kids
SHOP goUnders.
Women & Families Learning
Comfort on your Bike Seat
Clothing for Biking
Family Biking
Improve your Riding
Carrying Gear
Care for ‘you’
Care for your Bike
Ride More Places
Ride more Bikepaths
Ride more NZ Cycle Trails
Ride more Mountain Bike Trails
Ride more Multi-Day Rides
Ride more Places with Kids
Riding Gear
Bike Helmets
Bike Saddles
Padded Bike Underwear & Pants
Bike Gloves
Bike Jackets
Protective Padding
Bike Locks
Bike Lights
Bike Tools to Carry
Handlebar Grips
Bike and Chain Cleaning
Kids Bike Seats & Bikes
Kids Bike Trailer
Towing kids who ride their own bike
Rear Kids Bike Seats
Mid Mount Kids Bike Seats
Front Kids Bike Seats
Balance Bike
Types of Riding
Bikepath Riding
Family Riding
E-Bike Riding
goUnders- Padded Bike Underwear
Women, Mens, Youth & Kids
SHOP goUnders.