
goRide’s Quick and Easy Guide to Bike Tools. Let’s gain some knowledge about tyre levers. Learn what they are, why you would use it and how to use it.

What is a Tyre Lever Set
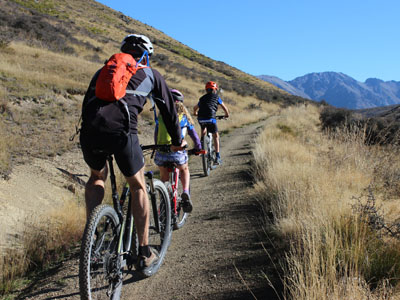
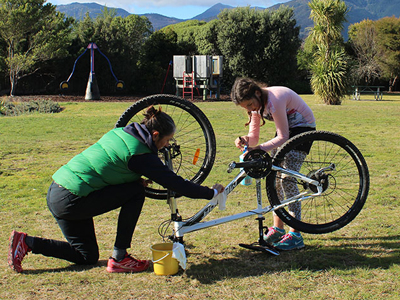
A small plastic tool design to help you get your tyre off of your wheel. There are several different styles on the market and you may need more than one depending on how you need to use it (see How do you use it? below). I use the black tyre lever with knuckle guard, in the photo below, at home. It has a great knuckle protection feature which saves your skin when you are forcing that little bit too hard and the whole thing slips, leaving you punching the wheel spokes. I carry the blue set on my bike, in my bike tool kit. The three levers are designed to slide together making them compact for carrying. A tyre lever is an essential part of even the most basic bike tool kit – if you get a puncture it’s impossible to fix without getting your tyre off and thats what tyre levers do.

Why you would use it.
There are 2 main uses for a Tyre Lever
Removing a tyre To remove your tyre from the wheel rim
Putting a tyre back on: To get the last little stubborn bit of your tyre back on the rim.
Examples of when you need to do this are
- when you have a flat tyre (puncture in your tube) to get access to the tube so you can replace it or patch it
- changing your tyre because the tread has worn out
- changing your tyre to improve grip e.g. in winter you may want a bigger tread on your tyre to deal with mud or wet tracks/roads.
How do you use it.
There are three ways to use a tyre lever depending on your tyre and how hard it is to get off/on. The first thing to do so you can get your tyre lever into position is to deflat your tube completely.
#1. Popping and sliding. You will need one tyre lever.
Now you need to get the curved end of the lever under the edge of your tyre then sit the lever on the wheel rim to get leverage to push it down and “pop” the tyre over the edge. Have a quick look at the curved end of this tool – it curves up and away from you. Below the curve it has a step where it gets thicker – this part should sit on your rim. Have a look at the photo of the blue set of tyre levers stacked together to help you understand what I’m talking about here (above).
Now depending on the fit of your tyre – how tight it is – you may or may not be able to run the lever around the edge of the wheel rim, “sliding” the tyre edge out as you go, removing that whole side of the tyre from the wheel. If the answer to that scenario was, no I can’t move the lever without it being pushed completely out or off the wheel rim, then you have need for more than one tyre lever as you have a tight fit to deal with.
#2. Fixing then sliding. You will need a set of tyre levers with a hook end.
OK, get that first tyre lever under the tyre, pushing it down to pop the edge over the rim. Now keep pushing all the way down until you can use the hook on the opposite end to securly “fix” the tyre lever to a spoke on your wheel. With that job done, pick up your next lever. Again we are working with the curved end which needs to be pushed under the tyre edge right next to your first lever. Get that lovely step sitting on the wheel rim now attempt to “slide” that lever along the rim pushing the tyre out and over as you go…. If your tyre is tight this will not be smooth or easy. When you can slide it no more fix it, then reach for your next lever. You may need to use all the levers in your set to get your tyre off the wheel rim.
#3. Push back on. You will need one tyre lever.
When putting your tyre back onto the wheel rim it can get tricky making the last little bit pop over the rim. This is when you can choose to use a tyre lever. Insert a tyre lever and push it up flicking the tyre over the rim. Opposite action to taking it off.
Remember next weeks story will take you through the process of changing your tyre – the bike lever is an essential tool for this job and these techniques are shown in the story.
That’s the basics of a tyre lever covered. I hope it helped you gain a little more understanding of the mechanics of your bike.

The different parts of a tyre lever.
The curve of the tyre lever placed under the edge of the tyre and pop the tyre of the rim of the wheel.
Your bike riding success is different to others… use our stories and support, get the right solutions.
Ride More Places

Bike Gear Stories
Women and families learning ...

Buying Guides

Solution Finder

Types of Riding Stories
Support and inspire other riders and families to ride
Share your riding outings, adventures and experiences on our quick and easy question and answer forms. Join us in helping others ride bikes. All entries receive a free shipping coupon and go into our seasonal prize draw.
goRide supporting women and families to SMILE when you ride
Women
Padded Bike Underwear
Pants for Biking
Tops for Biking
Jackets & Over Trousers for Biking
Riding Clothing for Larger Sizes
Warmth Accessories
Bike Saddles
Bike Helmets
Mountain Bike Helmets
Bike Gloves
Protective Padding
Bike Bells
Hydration
Handlebar Grips
Kids & Youth
Padded Bike Underwear
Bike Helmets
Mountain Bike Helmets
Riding Clothing
Jackets for Biking/Outdoors
Protective Padding
Bike Gloves
Bike Lights
Bike Bells
Handlebar Grips
Bike Saddle
Bike Locks
Hydration
Family
Ride with a baby/ 1 year old
Ride with a 2-6 year old
Ride with a 4 + year old – on their own bike
Full Range Kids Bike Seats – Attached or Towed
Create a Family Biking Holiday
Ride More Places with Kids
Men
Padded Bike Underwear
Bike Helmets
Mountain Bike Helmets
Bike Saddles
Bike Tops,Jackets & Over Trousers
Bike Gloves
Protective Padding
Handlebar Grips
Bike Bell
Be comfortable & confident
Successfully Ride an E-Bike
Beginner Rider
Heavy Riders – Enjoy Biking
Be Comfortable on your Bike Seat
Riding in Cooler Weather
Riding in Wet Conditions
Be Visible on the Bike
Enjoy a Biking Holiday
‘Fun Up’ the Kids Bike/Biking
goUnders- Padded Bike Underwear
Women, Mens, Youth & Kids

SHOP goUnders.
Clothing & Bags
Padded Bike Pants & Underwear
Pants & Shorts for Biking
Bike Tops
Bike Jackets
Over Trousers for Biking
Headbands & Neck Warmers for Biking
Bags, Baskets & Panniers for Biking
Rider Safety & Protection
Bike Helmets
Mountain Bike Helmets
Bike Gloves
Protective Padding
Bike Lights
Bike Bells
First Aid & Personal Care
Hydration
Bike Tow Ropes
Bike Parts & Care
Bike Saddles
Handlebar Grips
Bike Locks
Bike Carriers
Bike & Chain Cleaning
Bike Tools & Tool Kits to Carry
Kids Bike Seats & Bikes
Rear Kids Bike Seats
Mid Kids Bike Seats
Front Kids Bike Seats
Towing Kids who ride their own Bike
Bike Trailers for Kids
Kids Balance Bikes
HIRE Kids Bike Seats
Be Comfortable & Confident
Comfort on your Bike Seat
Be Visible on the Bike
Beginner Riders
Get Started – Ride with a baby
Heavy Riders – Enjoy Biking
Riding in Cooler Weather
Riding in Wet Conditions
‘Fun Up’ the Kids Bike/Biking
Bike Path Riding
Beginner to Fitness
Multi-Day
With Kids of all Ages
Kids Riding Bikepaths
Multi-Day with Kids
Bike Path Riding Guide
Ride more Bikepaths
Mountain Biking
Women Beginner to Intermediate
Men Beginner to Intermediate
Multi-Day
With Kids of all ages
Kids Mountain Biking
Multi-Day with Kids
Mountain Biking Guide
Ride more Mountain Bike Trails
Riding in Traffic
Be Visible in Traffic
Commuting
With Kids of all Ages
Kids Riding in Traffic
E – Biking
E-Biking in Traffic
E-Biking on Bikepaths
E-Biking on MTB Trails
A Biking Holiday
E-Biking Guide
Multi-Day Riding
Multi-Day on Bike Paths
Multi-Day on MTB Trails
Multi-Day with Kids on Bike Paths
Multi-Day with Kids on MTB Trails
Multi-Day Guide
A Biking Holiday
Family Biking Holiday
Ride more Multi-Day Rides
Family Riding
Full Range Kids Bike Seats – Attached or Towed
On Bikepaths with Kids
MTB with Kids
In Traffic with Kids
Family Biking Holiday
Family Riding Guide
Ride More Places with Kids
Kids Attached or Towed Buying Guides
Rear Kids Bike Seat
Mid Mount Kids Bike Seat
Front Kids Bike Seat
Towing Kids who ride their own bikes
Kids Bike Trailers
Kids & Youth Buying Guides
Kids Bike Helmets
Kids Riding Clothing
Kids Padded Bike Pants
Kids Padded Protection
Kids Handlebar Grips
Kids Balance Bike
Comfort on the Bike Buying Guides
Womens Bike Saddle
Mens Bike Saddle
Padded Bike Pants
Bike Jackets
Carrying Gear
Handlebar Grip
Hydration
Rider Safety Buying Guides
Bike Helmet
Mountain Bike Helmet
Protective Padding
Be Visible
Bike Glove
Bike Light
Mountain Bike Light
First Aid & Personal Care
Gear & Care for Bikes Buying Guides
Bike Carriers
Bike Cleaning
Bike Locks
Chain Cleaning and Lube
goUnders- Padded Bike Underwear
Women, Mens, Youth & Kids
SHOP goUnders.
Women & Families Learning
Comfort on your Bike Seat
Clothing for Biking
Family Biking
Improve your Riding
Carrying Gear
Care for ‘you’
Care for your Bike
Ride More Places
Ride more Bikepaths
Ride more NZ Cycle Trails
Ride more Mountain Bike Trails
Ride more Multi-Day Rides
Ride more Places with Kids
Riding Gear
Bike Helmets
Bike Saddles
Padded Bike Underwear & Pants
Bike Gloves
Bike Jackets
Protective Padding
Bike Locks
Bike Lights
Bike Tools to Carry
Handlebar Grips
Bike and Chain Cleaning
Kids Bike Seats & Bikes
Kids Bike Trailer
Towing kids who ride their own bike
Rear Kids Bike Seats
Mid Mount Kids Bike Seats
Front Kids Bike Seats
Balance Bike
Types of Riding
Bikepath Riding
Family Riding
E-Bike Riding
goUnders- Padded Bike Underwear
Women, Mens, Youth & Kids
SHOP goUnders.