

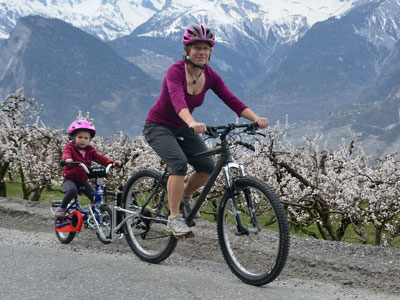
Attaching a Bike Tow Bar (Trailgator).
Create plenty of family biking memories with a Tow Bar by taking kids who are riding their own bike distances they may struggle to go on their own.

Welcome. The Trailgator Bike Tow Bar is a bike to bike attachment. It attaches from the lead bike to a trailing bike. Your child needs to be able to ride their own bike for the Tow Bar to be a solution for your family. The Tow Bar is safe up to 32kg – weight of trailing bike and rider.
When in use the front wheel of the trailing (child’s) bike is lifted off the ground. A stabilising bar prevents the handlebars from turning leaving the lead bike (adult) in control of steering. Your child can choose to pedal or not while being towed, making the ride easier for them and helping them SMILE.
Successfully attaching your Tow Bar
goRide recommends you follow the instructions of the manufacturer in attaching your Tow Bar. goRide attaches a Tow Bar to a variety of different bikes so we can understand and support your experience.
Before you start: Get what you need – the lead bike, trailing bike, the Tow Bar and any tools that you may need. Work your way through the following process:
Setting up the Tow Bar does take a bit of time so allow yourself that time..once installed it is quick and easy to attach to the lead bike before you ride using the quick release lever supplied as well as to the receiver plate on the kids bike also using the supplied quick release lever when you are out enjoying a ride.
 Lead Bike – Attachments to the Lead Bike
You have 3 mounts to complete attachments to the lead bike
1. Attach the seat post mount to the lead bike.
goRide Support:
You will need to remove your seat from the bike to install
To get a good fit – you may need to use a shim. Measure across the front of your seatpost. Match to the correct shim by measuring across the front of the shim.
Orientate the seatpost mount the correct way so it faces straight/slightly up NOT DOWN
Where to mount on your bike seat post? Mount at a height that gives the tow bar good clearance over your back wheel
2. Attach the Tow Bar to the Lead Bike – Seat Post Mount
goRide Support:
You attach the bar that is the smallest in diameter using the quick release lever provided
3. Attach the Lead Bike Storage Mount. You will also need to attach the bracket that stores the tow bar on the lead bike when it is not in use. This allows you and the child to ride independently and then easily attach to the childs bike to tow during a ride.
goRide Support:
You are attaching between the wheel nut or quick release lever and the frame of the bike.

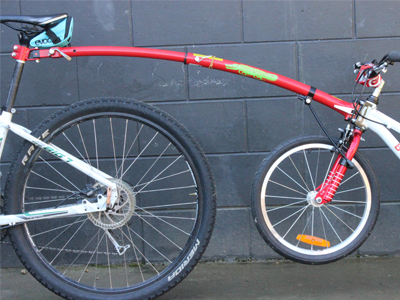
Seat post mount facing slightly up. If you mount it facing slightly down it will not give you the height you need to safely clear the back wheel of the lead bike. The Tow Bar has been mounted to the bracket using the quick release lever.

Bracket attaching to adult bike for storing the tow bar when not in use during a ride.
 Connect the 2 bars of the Tow Bar together
1. Attach the larger diameter bar to the smaller diameter bar (that is attached to the adult bike)
goRide Support:
You can vary the length on the bar: The size of the kids bike determines the length of the tow bar. Kids Bikes 16 inch and smaller the bar is at its shorter length. Kids bikes that are larger than 16 inch use the bar at its longer length.
.
 Trailing Bike – Attaching to the Trailing (Childs) Bike
You have 2 mounts to complete attachment to the childs (trailing) bike.
1. Attach the receiver kit to the child’s bike
goRide Support:
The set up of the U Bolts can be different to best suit different sized kids bikes and the frame design. See photo. Work out which set up works to allow you to attach at the junction where the tubes of the frame meet the steering tube.
Once you have the correct set up of the U Bolts connect to the steering tube with the U clamps. Attach the black receiver plate (make sure it is the right way up with the wider part ( the ears) at the bottom. Tighten the 4 bolts evenly so the bracket is positioned in the middle. It can take a little time to tighten.
Once you are happy with the position you can put on the protectors.
2. Attach the steering limiter to the kids bike
goRide Support:
Remove the front wheel of the kids. Work out what shims will give a good fit to attaching the clamp to the left front fork ( you have 2 sized clamps to choose from) To fit slide the clamp up the fork starting from the bottom. The positioning of the clamp was important to get a stable connection so it can limit the steering of the kids bike

3 options of U Bolt set ups – 1. both down. 2. one up one down or 3. both up.

U Bolt, U Clamps, Receiver plate and washers and screws (receiver kit) connected around the junction of the frame and steering tube of the kids bike.

Options for U bolt positions around the frame and steering tube of the kids bike.

Positioning of the steering limiter. There is also an option of attaching to the handlebars rather than the front fork.
 Connect the Lead Bike and the Trailing Bike with the Tow Bar
1. Attach the receiver kit to the child’s bike
goRide Support:
1. Attach the tow bar to the kids bike
Lift the kids bike to slide the tow bar down over the receiver plate until engaged over the widened areas ( the ears) on both the bar and the plate. Secure with the quick release lever
Measure the height the front wheel is off the ground is it 8-13cm. Please see troubleshooting and user manual if this is not achieved.

Tow bar connected to the receiver plate on the kids bike. Note we have chosen not to connect the the screw and plate protectors so you can see the connection

Once installed the kids bike should be 8-13cm off the ground.
Troubleshooting
If the kids bike is not 8-13 cm off the ground….does it need lowering or increase in height
You will need to alter your set up. Firstly make sure you have the tow bar is set to the correct length…you can set the tow bar to 2 different lengths get the right sized length for the size of your kids bike.
You may be able to alter the position of the receiver on the kids bike or insert a shim to the receiver…please refer to instruction manual
Further Reading & Support…
Full Range of stories on own easy to navigate page…on towing kids who ride their own bike
goRide attaches the Tow Bar to a variety of bikes so we can understand the experience and challenges. See our Tips for Attaching a Bike Tow Bar.
Your riding experience will be different when riding with a Bike Tow Bar than if you are riding solo… please see How does it feel to tow a child riding their own bike
Understand and compare your options for towing kids who ride their own bike please read Towing Kids who ride their own Bike Buying Guide
Enjoy the family time and memories that you will create with a Bike Tow Bar. goRide, supporting women and families to SMILE when you ride.
Your bike riding success is different to others… use our stories and support, get the right solutions.

Stories & Support
Towing Kids who ride their own Bike – goRides stories in one easy to navigate page.

Buying Guide
Towing Kids who ride their own Bike Buying Guide – What is the best Bike tow assist for your family? Get the towing asist that will best meet your families biking needs.

FAQ - Bike Tow Bar
All your questions answered on Bike Tow Bar. Create a tandem during a ride so you can bike more places with your child.
How does it feel?
What to expect when you tow a child riding their own bike. Great tips & advice.
How to Attach
All the guidance and advice you need to safely install and connect a Follow Me Tandem – Bike Tow Frame.
Ride more places with Kids?
Learn about other families bike riding experiences.
Want more from your riding?
Be supported to Ride as a Family, Progress Your Riding and/or receive Seasonal Inspiration. So you can SMILE when you ride.
All new members are automatically entered into our Seasonal Prize Draw.
SMILE when you ride
Support & Inspire other riders and families
Share your riding outings, adventures and experiences on our quick and easy question and answer forms. Join us in helping others ride bikes.
All entries are automatically entered into our Seasonal Prize Draw.