 How to get a wheel off a bike can be confusing and once you get it off, why won’t it go back on? It simply won’t ‘fit’ – what’s happened here?! I’m going to be honest, in the past I’ve sat looking at what is my very simple bike wheel in utter confusion.
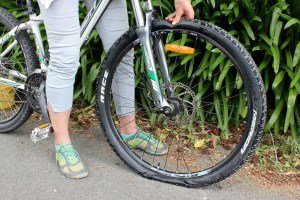 Why would you need to take your wheel off?
- when fixing a puncture you need access to your tube inside your tyre
- to transport your bike either to fit it inside a car or get it into a bike bag/box for airline travel
- to give your rear chain sprockets a really good clean – see Cleaning the Drive Train
- changing the tyre – see our How to Change a Bike Tyre story
- to fix or replace damage like buckling or broken spokes (when the wheel no longer spins in a straight line)
So we should be in agreement that if you own a bike this is a handy skill to have mastered.
To ‘get better’ at bike tasks you need to invest a little bit of time to understand a bike. This story is going to focus on how to get a wheel off & back onto your bike. All these steps apply to a kids bike also.
To follow is a step by step guide beginning with the front wheel then explaining the extra steps involved with the back wheel.
Women Learning Bike Parts
Step One Front Bike Wheel: BRAKES
[one-half-first]
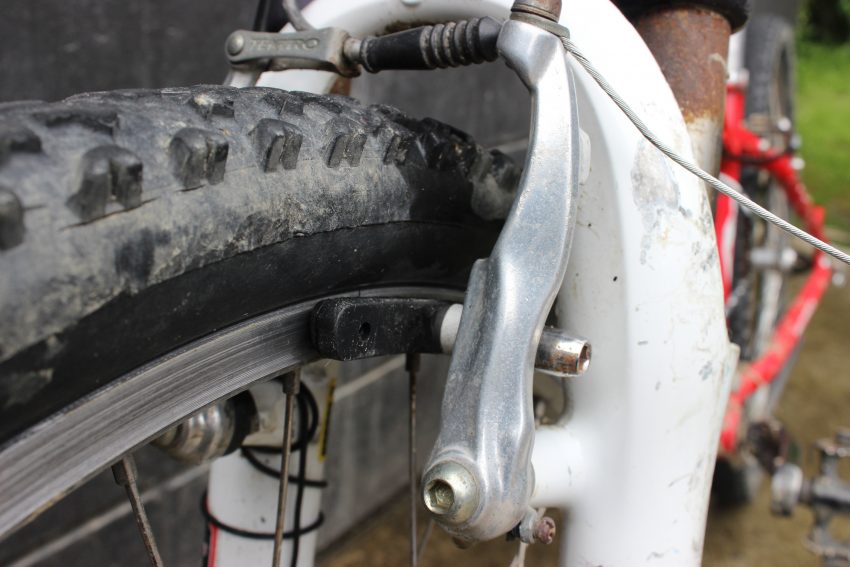
Rim Brake
[/one-half-first]
[one-half]
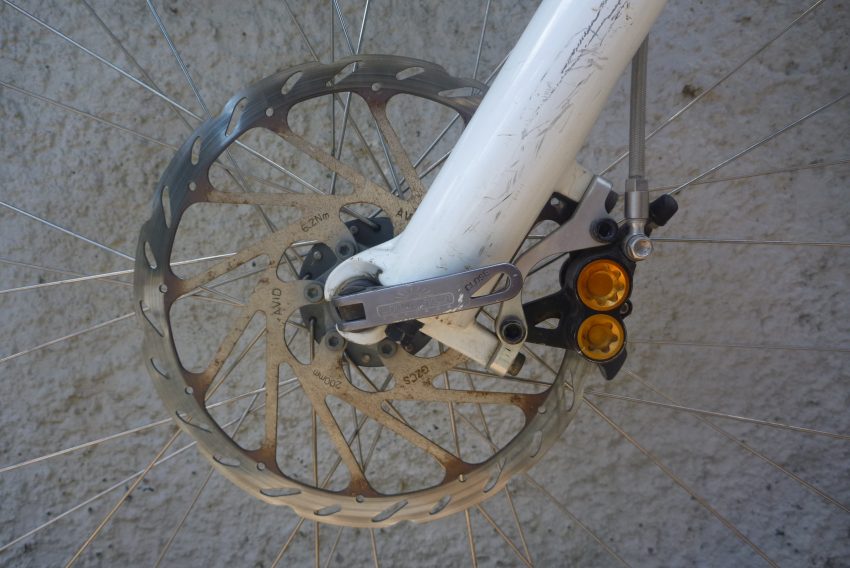
Disc brake
[/one-half]
Rim or Caliper brakes (pads on the rims of your wheel – see photo) will need to be released to allow your wheel room to move. To open a brake you are either looking for a lever or button on a sidepull system (more common on road, commuter bikes). Or to lift the cable on a v-brake (trail, mtn and kids bikes), see photo below.
[one-half-first]
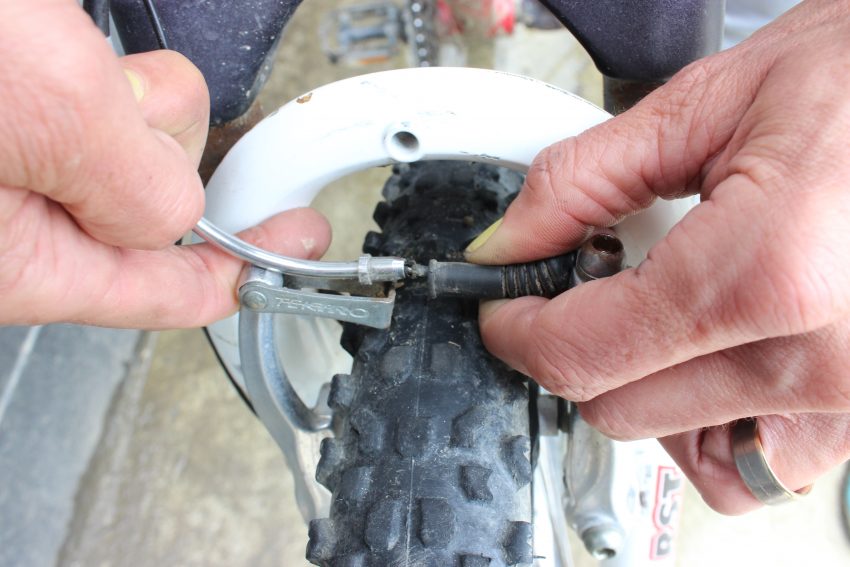
Pull back the rubber and push the cable up
[/one-half-first]
[one-half]
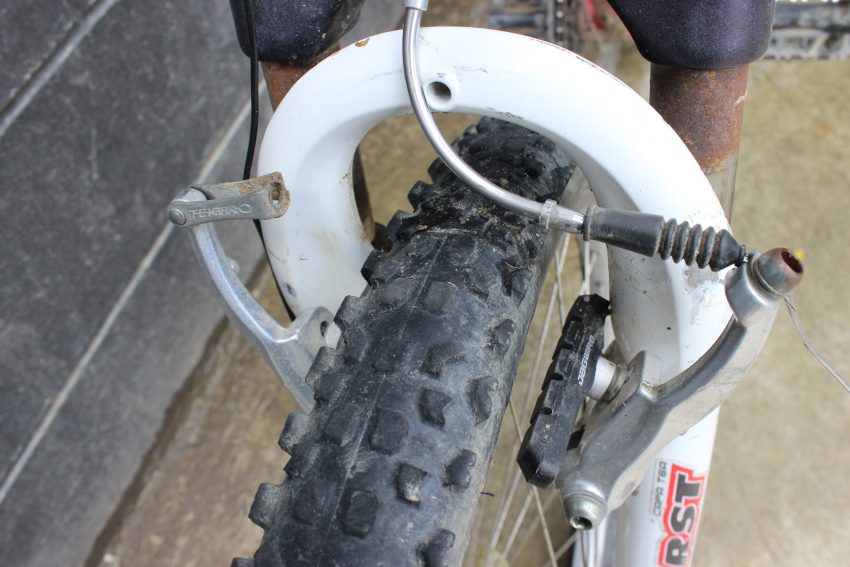
Open rim brakes give you room to move the tyre past them
[/one-half]
Disc brakes don’t need to be touched as the rotor surface is flat allowing it to slide out of the space between the brake pads. See disc brake photo above.
Note: if you have disc brakes it is really important that while the wheel is off the bike that the brake lever is not touched. Otherwise you will have to recalibrate the brakes…yeah you need to really understand how they work to do this so don’t touch the brake lever.
Step Two Front Bike Wheel: WHEEL AXEL
To undo the wheel axel either open the quick release or unscrew the axel bolt in the middle of the wheel. You will need a spanner/adjustable wrench to do this. You will also need both hands to do this job. Your spare hand will have to hold the bolt on the opposite side to the locking mechanism. So depending on how long your arms are in relation to the size of the wheel you are working on – it may be easier to turn the bike upside down. Don’t unscrew it completely you are just creating space. Watch out for springs, washers and/or bolts falling to the ground.
[one-third-first]

Quick release on front wheel hub
[/one-third-first]
[one-third]
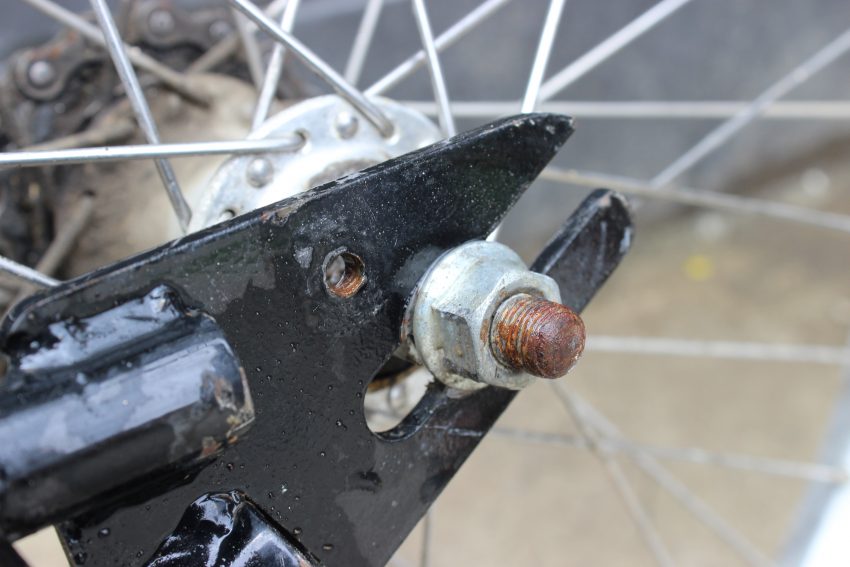
Axel bolt on rear axel – needs a spanner to open
[/one-third]
[one-third]
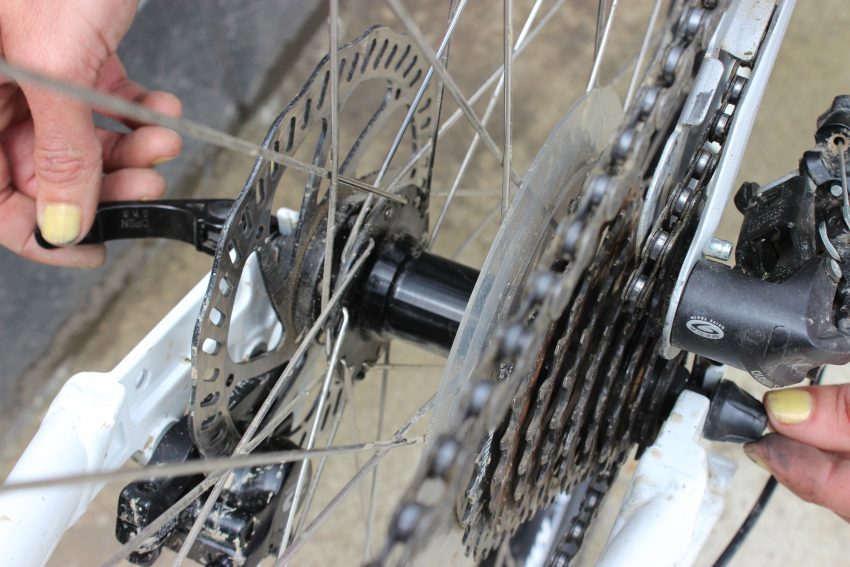
You need two hands to open or close a wheel axel
[/one-third]
Step Three Front Bike Wheel: DROPOUT
The wheel will be moving out of what is known as the dropout (see photos below). This dropout can be vertical or horizontal. You need to have a look to understand which way you need to move the wheel. If you have a horizontal dropout it is really important that you take note of where the wheel is secured along the length of the dropout so that when you replace the wheel it is in the correct position! EITHER use a marker pen or scratch a line on the dropout.
[one-half-first]

Vertical rear dropout – THE BIKE IS UPSIDE DOWN. Direction of movement is up & down.
[/one-half-first]
[one-half]
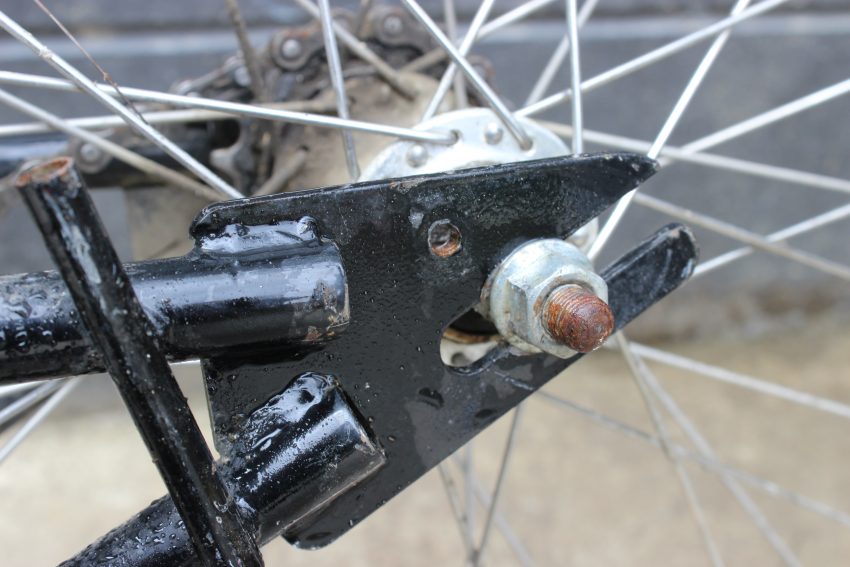
Horizontal dropout. Direction of movement is back & forward
[/one-half]
Now move the wheel out of the dropout – if everything is correctly undone the wheel will slide out of the dropout. If the wheel is going to be like this for a while, or you are transporting your bike somewhere, make sure you tighten up the wheel axel again. Otherwise, when you go to put the wheel back on the whole axel may have fallen out with its springs, washers and/or bolts.
Rear Bike Wheel Removal
For the rear bike wheel steps 1 & 2 are the same. It’s at step 3 that things get a bit more complicated as you are dealing with the chain & rear derailleur. To give yourself some chain slack shift your bike chain onto the small rear sprocket and the small front chainring. Confused?…to understand more about bike gears read some of our chain related stories listed below in related resources.
Once you have shifted your chain it is actually easier to manage this rear bike wheel procedure with the bike upside down. Now follow steps 1 & 2 for front wheel removal – open rim brakes, if you have them, then release the wheel axel.
Step Three Rear Bike Wheel: DERAILLEUR
Lift the derailleur & pull it towards you (see photos below). Take your time here and have a good look at what this has done in terms of creating space. Now with your other hand, slide your wheel off the rear dropout. Again what kind of dropout do you have? (See Step Three Front Wheel). As you lift the rear bike wheel it will get caught on the chain so gently let go of your derailleur and lift the chain out of the way.
[one-half-first]
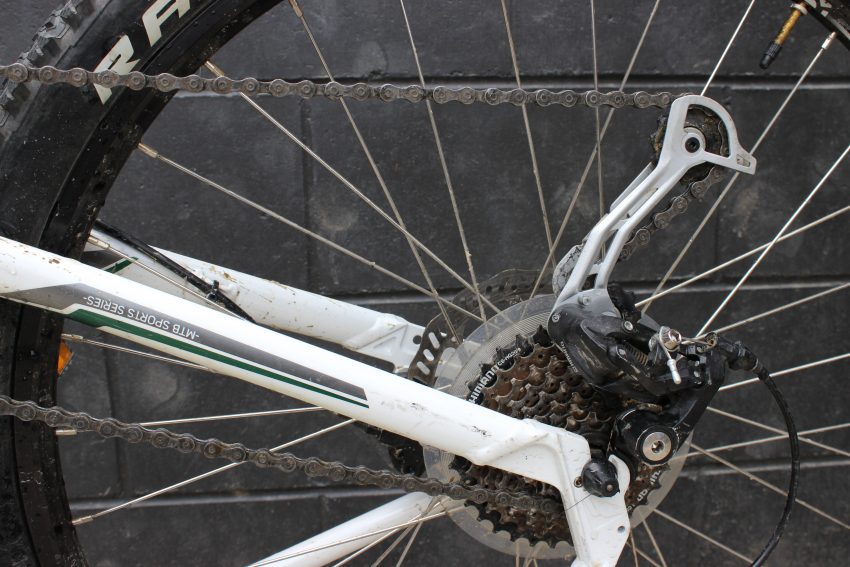
Rear derailleur in its normal position blocks the lifting of your wheel
[/one-half-first]
[one-half]
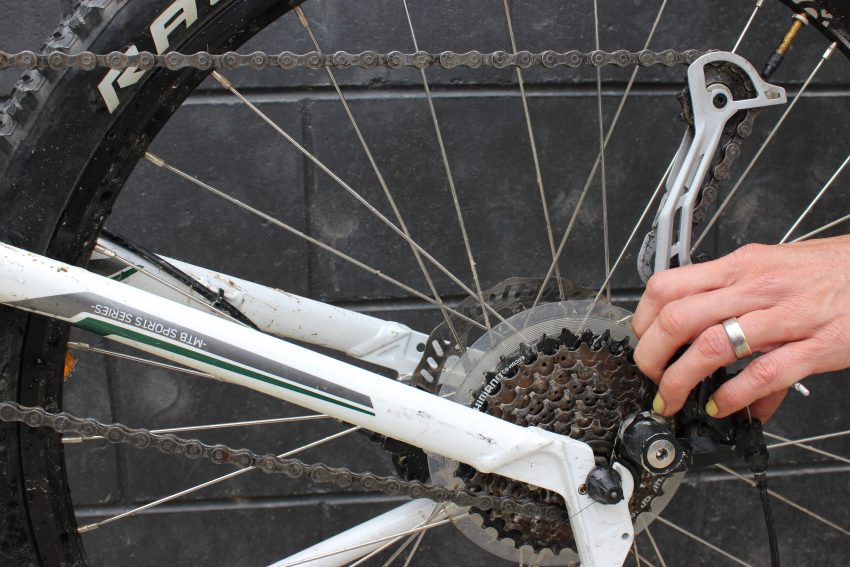
Lift the derailleur up and back and you create space.
[/one-half]
Yah, 1, 2, 3 and it’s off. Now reverse the steps 3, 2, 1 and put it back on.
Things to watch out for when placing your wheel back on your bike
FRONT WHEEL BACK ON
- the biggest thing you need to be wary of is disc brakes. The rotor (big steel circle) needs to slide back into a very small place between the brake pads (see photo below). So slow down and take a look, this requires a bit of hand eye coordination.
- think about where the quick release lever is going to end up. Ideally this needs to be aligned with a part of your frame so that it won’t catch on something and open while you are riding. Using a hand on either side of the axel move the lever into your desired spot. If it is too easy to close, tighten it with the axel bolt in your opposite hand.
- you must remember to do your rim brakes back up!
REAR WHEEL BACK ON
- think about your chain. You had to lift it off to remove the wheel so know you have to get the wheel hub and sprockets back inside the chain loop
- get that rear derailleur out of the way again, lift and pull it towards you (bike needs to be upside down)
- the disc brake rotor (big steel circle) needs to be lined up to slide into a very small place between the brake pads (see photo below). So slow down this requires a bit of hand eye coordination
- you must remember to do your rim brakes back up!
- think about where the quick release lever is going to end up. Ideally this needs to be aligned with a part of your frame so that it won’t catch on something and open while you are riding. Using a hand on either side of the axel move the lever into your desired spot. If it is too easy to close, tighten it with the axel bolt in your opposite hand.

This is the small gap the rotor has to slide into on disc brakes
Hopefully this has given you some useful tips to make life with a bike easier. Choose to learn a new skill & know what to do then you will goRide more places, more often with a SMILE.
[themeone_section type=”full-width” bgcolor=”#fafafa” txtcolor=”dark” decotop=”” decobot=””]
Thanks for reading. Used together our stories, resources & products support you to achieve and develop as a rider.
Related goRide Resources:
How to use your bike shifters – to change gears
The right gear at the right time
goRide helps you and your family to smile when you ride…now it’s your turn. Contact goRide. Your thoughts, comments or feedback will make us smile. [/themeone_section]
Women
Padded Bike Underwear
Pants for Biking
Tops for Biking
Jackets & Over Trousers for Biking
Riding Clothing for Larger Sizes
Warmth Accessories
Bike Saddles
Bike Helmets
Mountain Bike Helmets
Bike Gloves
Protective Padding
Bike Bells
Hydration
Handlebar Grips
Kids & Youth
Padded Bike Underwear
Bike Helmets
Mountain Bike Helmets
Riding Clothing
Jackets for Biking/Outdoors
Protective Padding
Bike Gloves
Bike Lights
Bike Bells
Handlebar Grips
Bike Saddle
Bike Locks
Hydration
Family
Ride with a baby/ 1 year old
Ride with a 2-6 year old
Ride with a 4 + year old – on their own bike
Full Range Kids Bike Seats – Attached or Towed
Create a Family Biking Holiday
Ride More Places with Kids
Men
Padded Bike Underwear
Bike Helmets
Mountain Bike Helmets
Bike Saddles
Bike Tops,Jackets & Over Trousers
Bike Gloves
Protective Padding
Handlebar Grips
Bike Bell
Be comfortable & confident
Successfully Ride an E-Bike
Beginner Rider
Heavy Riders – Enjoy Biking
Be Comfortable on your Bike Seat
Riding in Cooler Weather
Riding in Wet Conditions
Be Visible on the Bike
Enjoy a Biking Holiday
‘Fun Up’ the Kids Bike/Biking
goUnders- Padded Bike Underwear
Women, Mens, Youth & Kids
SHOP goUnders.
Clothing & Bags
Padded Bike Pants & Underwear
Pants & Shorts for Biking
Bike Tops
Bike Jackets
Over Trousers for Biking
Headbands & Neck Warmers for Biking
Bags, Baskets & Panniers for Biking
Rider Safety & Protection
Bike Helmets
Mountain Bike Helmets
Bike Gloves
Protective Padding
Bike Lights
Bike Bells
First Aid & Personal Care
Hydration
Bike Tow Ropes
Bike Parts & Care
Bike Saddles
Handlebar Grips
Bike Locks
Bike Carriers
Bike & Chain Cleaning
Bike Tools & Tool Kits to Carry
Kids Bike Seats & Bikes
Rear Kids Bike Seats
Mid Kids Bike Seats
Front Kids Bike Seats
Towing Kids who ride their own Bike
Bike Trailers for Kids
Kids Balance Bikes
HIRE Kids Bike Seats
Be Comfortable & Confident
Comfort on your Bike Seat
Be Visible on the Bike
Beginner Riders
Get Started – Ride with a baby
Heavy Riders – Enjoy Biking
Riding in Cooler Weather
Riding in Wet Conditions
‘Fun Up’ the Kids Bike/Biking
Bike Path Riding
Beginner to Fitness
Multi-Day
With Kids of all Ages
Kids Riding Bikepaths
Multi-Day with Kids
Bike Path Riding Guide
Ride more Bikepaths
Mountain Biking
Women Beginner to Intermediate
Men Beginner to Intermediate
Multi-Day
With Kids of all ages
Kids Mountain Biking
Multi-Day with Kids
Mountain Biking Guide
Ride more Mountain Bike Trails
Riding in Traffic
Be Visible in Traffic
Commuting
With Kids of all Ages
Kids Riding in Traffic
E – Biking
E-Biking in Traffic
E-Biking on Bikepaths
E-Biking on MTB Trails
A Biking Holiday
E-Biking Guide
Multi-Day Riding
Multi-Day on Bike Paths
Multi-Day on MTB Trails
Multi-Day with Kids on Bike Paths
Multi-Day with Kids on MTB Trails
Multi-Day Guide
A Biking Holiday
Family Biking Holiday
Ride more Multi-Day Rides
Family Riding
Full Range Kids Bike Seats – Attached or Towed
On Bikepaths with Kids
MTB with Kids
In Traffic with Kids
Family Biking Holiday
Family Riding Guide
Ride More Places with Kids
Kids Attached or Towed Buying Guides
Rear Kids Bike Seat
Mid Mount Kids Bike Seat
Front Kids Bike Seat
Towing Kids who ride their own bikes
Kids Bike Trailers
Kids & Youth Buying Guides
Kids Bike Helmets
Kids Riding Clothing
Kids Padded Bike Pants
Kids Padded Protection
Kids Handlebar Grips
Kids Balance Bike
Comfort on the Bike Buying Guides
Womens Bike Saddle
Mens Bike Saddle
Padded Bike Pants
Bike Jackets
Carrying Gear
Handlebar Grip
Hydration
Rider Safety Buying Guides
Bike Helmet
Mountain Bike Helmet
Protective Padding
Be Visible
Bike Glove
Bike Light
Mountain Bike Light
First Aid & Personal Care
Gear & Care for Bikes Buying Guides
Bike Carriers
Bike Cleaning
Bike Locks
Chain Cleaning and Lube
goUnders- Padded Bike Underwear
Women, Mens, Youth & Kids

SHOP goUnders.
Women & Families Learning
Comfort on your Bike Seat
Clothing for Biking
Family Biking
Improve your Riding
Carrying Gear
Care for ‘you’
Care for your Bike
Ride More Places
Ride more Bikepaths
Ride more NZ Cycle Trails
Ride more Mountain Bike Trails
Ride more Multi-Day Rides
Ride more Places with Kids
Riding Gear
Bike Helmets
Bike Saddles
Padded Bike Underwear & Pants
Bike Gloves
Bike Jackets
Protective Padding
Bike Locks
Bike Lights
Bike Tools to Carry
Handlebar Grips
Bike and Chain Cleaning
Kids Bike Seats & Bikes
Kids Bike Trailer
Towing kids who ride their own bike
Rear Kids Bike Seats
Mid Mount Kids Bike Seats
Front Kids Bike Seats
Balance Bike
Types of Riding
Bikepath Riding
Family Riding
E-Bike Riding
goUnders- Padded Bike Underwear
Women, Mens, Youth & Kids

SHOP goUnders.
