


Using a specific cleaning kit for a hydration bladder (reservoir) makes keeping the bladder and its tubes clean, hygenic and means they will last a lot longer
Supporting you and your family to SMILE when you ride.

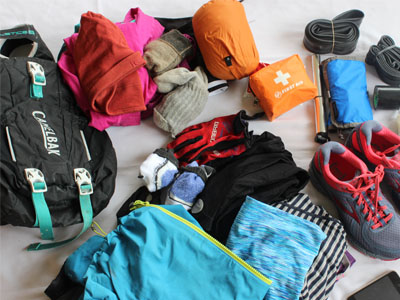
I have always been a little unsure about hydration bladders(reservoir) as my method of carrying water on the bike because of challenge of keeping them clean. Even with a bit of effort they seem impossible to dry and therefore water remains in the bladder and the tube after use. Our kitchen bench often has bladders propped open over drink bottles and tubes lying around on benches as we try and find the best way to dry the insides or the bladder and tube and avoid them growing mold.
With better design into solving some of these issues – its has got easier, it has got more hygenic.
Let’s look at how best to keep your bladder clean and hygenic. Using this method does require an investment in the Cleaning Kit but given your initial investment in a hydration reservoir and backpack it’s worth it, especially for a family where there is often more than one reservoir to keep clean. Keeping the reservoir clean will extend the life of the reservoir and make sure it is hygenic to use.
The Cleaning and Drying Process
1. Remove the tube from the bladder
2. Cleaning the Bladder
- Always empty your bladder after use.
- Pop some warm water into the bladder. Add a little a environmentally friendly detergent.
- Use the large brush to scrub the inside of the reservoir
- Tip the water out and rinse thoroughly.
- Dry the inside of the reservoir with a towel
- Insert the hanger and hang to allow to dry thoroughly
- Insert the port to allow the inside of the reservoir to dry thoroughly
For a more thorough clean you can use the cleaning tablet (there are a couple in the kit) or add a tsp of baking soda and let sit 5-30mins and then repeat the cleaning process described above
3. Cleaning the Tube
- Rinse the tube with water
- Scrub the tube using the tube brush. The brush is designed so that it can clean the full length of the tube.
- Rinse the tube again with water.
- Tip the tube up to remove the water
- Hang the tube to dry with the bladder.
4. Once dry store so you are ready for your next ride

Contents in the Hydration Bladder Cleaning and Drying Kit

Hydration bladder using hook and port for drying
Your bike riding success is different to others… use our stories and support, get the right solutions.

Ride More Places
Bike Gear Stories
Women and families learning ...
Buying Guides

Solution Finder

Types of Riding Stories
Support and inspire other riders and families to ride
Share your riding outings, adventures and experiences on our quick and easy question and answer forms. Join us in helping others ride bikes. All entries receive a free shipping coupon and go into our seasonal prize draw.
goRide supporting women and families to SMILE when you ride