Mountain bike night riding – could this be for YOU? Would this be a fun way to extend your riding season? Find out what you need to stay safe on a dawn/dusk or night time mountain bike ride. This is a simple guide for first time night riders so you can gain the confidence to get out there and give it a go
A really important part of your whole night riding experience is having the right type of lights. The more powerful the light the more expensive it will be. A good starting set up of lights for night riding would be
front handlebar 2000+ lumens wide beam to illuminate the trail
along with a front helmet 800+ lumens to illuminate corners, changes in terrain – this light will track where your eyes look to
You want easy, flexible attachment options so you can get the lights on/off, move them when or if you need to.
Having a variety of modes so you can adjust the light according to whats happening e.g. less light to climb up hills, less light to ride through town, to the tracks. This will increase your overall ride time. When lights are used at full strength – as you will probably do when heading down the hill – it uses the battery power up.
Following on from this point… you need to have a fairly good idea of how long you will have light so you can plan a ride that matches to your light time. Planning ahead if your battery needs to be charged, carrying spare batteries if this is how your light is powered.
You will also need a rear light preferably set on a steady mode so your friends can judge how far in front of them you are (flashing lights attract attention but can be hard for distance estimating).
Front bike light and helmet light to light the trail and the surrounds
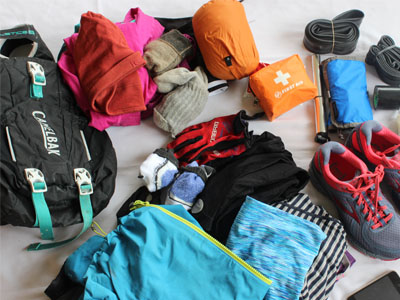
Go easy on layers when heading up – try not to sweat too much. Avoid wearing a bag that will trap moisture if possible – basically try not to make your clothing damp or wet as this will make you cold when you head into the fun downhill part of your ride.
Try to add warmth to places that suffer in colder conditions – fingers/toes/neck/head. These additions are a great way for you to feel protected and we would recommend thermal fabrics or merino.
Take or wear a jacket that will block cold airflow. The air around you will not be warm, in winter at night time, in New Zealand.
Know what the weather is supposed to be doing – you can’t see any changes in the weather at night time or in limited visibility.
Keep to tracks you know – now is not the time to try something new. If you are nervous about night riding for the first time it can be a good idea to start in some light/twilight. This helps with your confidence and you can progress to darkness.
Get warm as soon as you get home – out of any damp or wet clothes, into a shower
Your bike riding success is different to others… use our stories and support, get the right solutions.
Read stories about NZ trails, tracks & parks. Find out what other families & riders are doing. Be inspired! Is this ride an option for you or your family?
A collection of stories that will help you learn about bike gear. goRide supporting you to get the right bike gear solution for the type of riding you do or want to do.
Stories in Types of Riding support you to learn about riding a bike in different environments. So you can successfully choose to ride more place, more often.
Support and inspire other riders and families to ride
Share your riding outings, adventures and experiences on our quick and easy question and answer forms. Join us in helping others ride bikes. All entries receive a free shipping coupon and go into our seasonal prize draw.
Welcome to Winter riding tips. Cold and potentially wet weather awaits you on the bike. Winter riding is about finding ways to continue and enjoy your riding through the colder and shorter days.
Supporting you and your family to SMILE when you ride.
Welcome to winter riding tips. It is easy to enjoy this season on your bike or as we like to say ‘Outwit the Weather’. You just need to be aware of what conditions you are potentially riding in and have solutions to any challenges.
To enjoy winter on your bike you need to get ready with some extra gear or bike accessories. Some additions are for safety, others to help with your temperature management. There is nothing worse than being cold when riding. Add cold to wet and this can quickly lead to issues. Not so bad if you’re riding in town and can get home quickly… It can be a disaster if you have decided to ride in an isolated environment.
For more on hyperthermia head to the end of this story where there is a detailed description of mild hyperthermia and what to do if someone in your bike group has it.
Everyone will have a slightly different list of requirements to keep them smiling while winter riding. Just pick out the tips you think apply to you, in terms of how you would like to ride in winter. If your bike of choice is an E-Bike all this stuff applies – perhaps more – as you can go further and the weather may change on you. You can also move faster with less effort so wind chill/warmth on the bike might be a bigger issue.
Be Warm on your Ride
Layer up base, mid & outer layers. This gives you flexibility as you warm up on the bike you can remove clothing or as you feel chilled or cold you can add protection. Thermal jackets are designed to block wind flow and keep you snug. All jackets will help with this, even a vest to protect your core is helpful.
Know about fabric, especially what you choose to wear close to your skin. As you ride a bike and perhaps begin to sweat, base layers need to be pulling this moisture away this is called wicking. Merino is great at this, cotton is not. For more information see the link below about layering.
Add length in gloves to full fingers options. Add length in 3/4 or long pants. Waterproof over trousers are generous in sizing & shape so layers for warmth can be worn underneath.
Protect extremities – merino socks for toes, a headband or neck warmer, a beanie under your helmet for your ears, neck warmers or scarfs for around the neck/upper chest and fleece lined gloves for fingers. Extremities can be a real challenge to keep warm while riding in the cold (any temperatures under 10 degrees), especially if you already have circulation issues. Again layer up and try to keep moving them, readjusting position, wiggling fingers or toes all helps.
Thermal Jacket – a jacket for warmth. Can be used as an outer or mid layer
Stay Dry on your Ride
Jackets are key – waterproof to water resistant. Whatever you think matches the type of riding you are about to do. Just make sure you have it on or with you. It’s no good hanging in the wardrobe at home. Jackets designed for wearing on a bike will work better. Bike jackets are usually what are called lightweight shells – they have little to no insulating layers to allow for the fact you are exercising in them. Be aware of length, a lot of bike jackets are short in design to not interfere with the seat when you dismount. Also they are fitted so you don’t create a parachute when moving.
Try mud guards to reduce the spray. These are great for commute riding to reduce the debris/grit/water from the road. Also great for mountain bike riders to reduce the mud – see Mud Guards for MTBs
Maybe waterproof over trousers would keep you riding all year, this type of pant is a great idea for commute riders committed to riding in all weather conditions.
Know the weather you are heading into especially if its a big day ride, anywhere isolated or back country multi day riding. What is the weather forecast and how quickly could the weather change? If you are riding somewhere new or anywhere isolated always be over prepared, weather can be very unpredictable in New Zealand. It is your responsibility to carry and use gear that will keep you safe. Waterproof jackets with high breathability ratings are best matched to this type of riding.
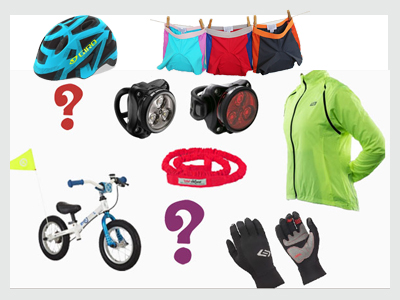
Visibility is often an issue in adverse weather which winter often brings. Heavy rain and low light levels can make it difficult for drivers to see bikes. Winter also means shorter days so you are much more likely to be riding at night time. It is NZ law to ride with one front & one rear light 30 minutes before sunset to 30 minutes after sunrise.
To help, even during daylight, we recommend
using lights. If possible two on the rear, one positioned high, one attached lower e.g. on your helmet/high on a backpack and on your seat post/rear carrier. One flashing to attract attention, one constant to help the driver judge distance
wearing bright outer layers, a bright helmet or a bright coloured back pack all helps
reflective strips or covers work really well in low/poor light or night riding situations. On jackets, trousers, bags or bands that you wrap around your upper arm or leg
Being responsible and thinking ahead is just part of safely completely any kind of ride on your bike, in any season, over any kind of distance. For more detailed information on helmets, tools, first aid, lights, carrying gear and how these things relate to safety, check out our Safety Stories.
If you are bike touring in conditions with a significant Cold Challenge – Temperature, Wetness, Wind combined with fatigue, poor food intake and/or dehydration you need to be aware of the risk of mild hypothermia
Watch for the “Umbles” – stumbles, mumbles, fumbles, and grumbles which show changes in motor coordination and levels of consciousness
Shivering – not under voluntary control, not easily stopped
Can’t do complex motor functions (single track riding) can still walk & talk
Numbness in periphery (hands, feet)
Heat Retention + Heat Production less than Cold Challenge = Hypothermia
What can you do for mild hypothermia?
Reduce heat loss by adding layers of clothing, getting dry clothing on, increasing physical activity or providing shelter. Use a survival blanket
Add fuel & fluids. It is essential to keep a hypothermic person adequately hydrated and fuelled
Add heat, fire or other external heat source. Body to body contact. Get into a sleeping bag, in dry clothing with a normo-thermic person in lightweight dry clothing
Your bike riding success is different to others… use our stories and support, get the right solutions.
Read stories about NZ trails, tracks & parks. Find out what other families & riders are doing. Be inspired! Is this ride an option for you or your family?
A collection of stories that will help you learn about bike gear. goRide supporting you to get the right bike gear solution for the type of riding you do or want to do.
Stories in Types of Riding support you to learn about riding a bike in different environments. So you can successfully choose to ride more place, more often.
Support and inspire other riders and families to ride
Share your riding outings, adventures and experiences on our quick and easy question and answer forms. Join us in helping others ride bikes. All entries receive a free shipping coupon and go into our seasonal prize draw.
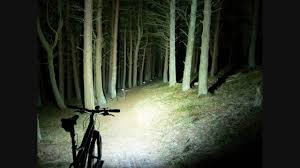
Bike lights for mountain biking at night extend your riding season by helping you to see the trail when it is dark. They also offer a different, challenging and fun biking experience.
Supporting you and your family to SMILE when you ride.
how the light can be displayed. eg flashing modes versus constant beam
length of the battery time
type of battery eg. USB rechargeable or installed battery and whether that battery is integrated or separate
where and how they can be attached to the bike or the rider
weight and size of the light
Different types of lights suit different riding environments so it is important you get the right bike light for the type of riding YOU do.
Night Riding Mountain Bike Lights Need…
Enough light so you can clearly see the trail and its obstacles and have an understanding of the surrounding environment
Provide light for a good length of time (greater than your night mountain bike riding time).
Make sure other riders can see you when riding in darkness.
Durable and robust to match the mountain biking environment.
Secure attachment that can be easily attached and removed for ease of use.
Waterproof as you may need to ride in the rain.
Key Design Features of MTB Lights for Night Riding
Strength & Placement:
Strength of the front light – it is the strength of the light (measured in lumens) and where it is positioned that will help you to see the trail and its obstacles.
You must have a front light attached to the handlebars – slightly pointing down to luminate the lumps and bumps of the trail helping you to pick your riding line. Suggested strength of 2000 lumens plus.
A second light attached to your helmet of 800 lumens plus will flood light in front of you and give you awareness of the trail direction, its corners and the surrounding environment.
A low lumen constant rear light be can be used to help your riding group know where you are. This can be used on flashing mode if you need other riders sharing the trail to know they are approaching you.
Battery Life/Time – needs to be greater than your riding time. Different modes offer different levels of efficiency (that is greater battery life) so you may be able to maximise the life of the light by altering the mode used. E.g. less lumens are often needed when climbing compared to going downhill. Lithium ion batteries allow you to rechargeable the battery after every use without compromising the life of the battery. A battery life indicator can be helpful to understand the amount of battery remaining.
Flexible Attachment – this allows you to easily attach and remove the lights. You will only want these lights attached to your bike if you are heading out for a night ride, or there is a chance that you may not make it back from your ride before the onset of darkness.
Variety of Modes – that are easy to switch between will offer you different strength outputs for different riding conditions which will help you manipulate the life of the battery.
Read stories about NZ trails, tracks & parks. Find out what other families & riders are doing. Be inspired! Is this ride an option for you or your family?
A collection of stories that will help you learn about bike gear. goRide supporting you to get the right bike gear solution for the type of riding you do or want to do.
Stories in Types of Riding support you to learn about riding a bike in different environments. So you can successfully choose to ride more place, more often.
Support and inspire other riders and families to ride
Share your riding outings, adventures and experiences on our quick and easy question and answer forms. Join us in helping others ride bikes. All entries receive a free shipping coupon and go into our seasonal prize draw.
Understand more about how bike lights attach. The attachment you choose can effect where you can mount your light, whether you can share lights with a family member and their management when you lock and leave your bike.
]I was out driving in the weekend, during the day, on a windy narrow road that I know cyclists like to use. I was very thankful to the one cyclist I came across as he had done a great job to make himself visible by attaching bike lights in a great way. He was riding during the day but he had two flashing rear lights that were vertically stacked. He had one mounted to the back of his helmet and the other to the back of his seatpost.
By doing such a great job attaching his bike lights I had an enjoyable experience sharing the road with him. He was enjoying his ride knowing that he had made himself as visible & safe as possible in a challenging environment. For more on riding with lights in different envirnoments
Attachment Options…
Let’s look at the different systems that can be used when attaching bike lights. What would work well for YOU?
Fixed Mount – 2 piece
The bike light
A mount that you permanently attach to your bike with a bike tool. The mounts are usually attached to the handlebars for the front bike light and the seat post for the rear light. This mount has a quick release system that allows you to attach & remove the bike light.
This type of mount and bike light is generally a cheaper light option and often quite large and bulky. This does mean that the mount is permanently attached to your bike and takes up some of that valuable handlebar space. As there is only one mount this bike light offers no flexibility to be shared between bikes and different users (eg. multiple members of the family). To ensure that these bike lights do not disappear, if you leave your bike unattended, it is important to remove the lights and carry them with you.
Fixed Mount – 1 piece
The bike light and the mount are all in one. This light is permanently fixed to the bike and the biggest benefit here is there is less of a requirement to remove the bike lights if you leave the bike unattended as someone is going to need a bike tool to remove these lights. Though the question you need to ask here is do I want my lights permanently attached to my bike?
Flexible Mount
A flexible mount system allows you to quickly and securely attach the bike light as and when you need to use your lights. This attachment system requires NO TOOLS meaning you can switch easily between bikes and between users. The light can be shared by all those in the family that may venture out in riding conditions that require them to be visible or to see where they are going. A flexible attachment offers you the ability to attach the light to a handlebar or seatpost as well as helmet, carrier, bag or clothing depending on the environment you are about to ride in. With multiple options of attachment this also provides you with the ability to vertically stack your lights. That is ride with 2 front lights or 2 rear lights, one higher than the other.
Where can you mount your Bike Light…
Where can you MOUNT your FRONT BIKE LIGHT
Handle bars are a good urban commuting option to light the road directly in front of you. To attach a light to the handlebars you need space and to be able to clamp it shut without catching any brake or gear cables. Ideally you want to mount it as close to the centre as possible. You will need a light that will fit around the diameter of your handlebars. Handlebars generally have diameters of 25.4, 26 or 31.8mm.
The Helmet is a good off-road front light riding option because the light will go where you look. If this is an option you want to consider then go for a light that is designed to attach to a helmet mount. Lights for off-road riding like mountain biking generally will attach to helmets . Flexible light attachments may offer the ability to attach anywhere on your helmet but this is dependant on the type of helmet you have…. To attach a light easily to the front or back of your helmet you need ventilation holes that are in the right place and not too wide apart. You need to make sure that the attachment does not affect the straps that are used to securely fit the helmet to the head.
Where can you MOUNT your REAR BIKE LIGHT
The Seat Post is generally the best and the most obvious choice for attachment of a rear bike light. To attach a light to the seat post it needs to be able to fit around the diameter of your seat post. Seat post diameters are generally 27.2, 30.9 or 31.6mm. You will need space on the seatpost to fit the light. This could be an issue if you don’t have a lot of exposed seat post i.e. if you have short legs, prefer your seat to be low or you have a carrier and/or panniers that are in the way. You also need to be able to clamp it shut without catching any seat dropper cables (if you have a seat dropper). Remember the reason for the light is to be visible to others so be careful that the beam of the light is not obstructed by anything. For example; the top arch of your rear wheel or a seat post tool bag. Place the light on the seatpost where the beam of light will be most visible to others.
The following options for attaching a rear light can be used by themselves or are great used in combinations for rear vertical stacking – having 2 rear lights at different heights.
Helmet – depending on the type of helmet you have…there are so many variations on the market. To attach a light easily to the back of your helmet you need a flexible attachment and ventilation holes. These ventilation holes need to be in the right place and not too wide apart. You need to make sure that the attachment does not affect the straps that are used to securely fit the helmet to the head.
Bag – find a strap or loop at the top of your bag and using a small flexible attachment strap your rear light high on the back of the bag. Lightweight rear lights like the Frog Strobe rear and Blinder Mob rear and The Blinder R70 are ideal for this type of use.
Clothing – some sports clothing/jackets may have a strap or loop that can offer an option for attachment
Carrier – if you have a carrier the back of this may provide the best unobstructed view of your rear light
[vc_row][vc_column][vc_row_inner][vc_column_inner width=”2/3″][themeone_spacer height=”38px”][vc_column_text]Riding with the ‘right’ bike light is essential to keep you and other users safe. How do you know if you have the right bike light? We need you to understand the type of riding you do and what riding environments you are or could be exposed to and then we match those needs to the features in a bike light.
Lets help you make the ‘right’ bike light decision. Let us help you make sure you use your ‘right’ light well.
Firstly, it is really helpful if you understand the features of bike lights so have a read of this…its quick and really useful.[/vc_column_text][/vc_column_inner][vc_column_inner width=”1/3″][themeone_spacer height=”18px”][vc_btn title=”Bike Light Buying Guide” style=”flat” color=”violet” size=”lg” link=”url:https%3A%2F%2Fgoride-debugclone.mystagingwebsite.com%2Fportfolio%2Fbike-light-buying-guide%2F||target:%20_blank|”][themeone_spacer height=”18px”][vc_btn title=”Shop Bike Lights” style=”flat” color=”warning” size=”lg” link=”url:https%3A%2F%2Fgoride-debugclone.mystagingwebsite.com%2Fbike-lights%2F||target:%20_blank|”][/vc_column_inner][/vc_row_inner][vc_row_inner][vc_column_inner][vc_column_text]
When should you use a bike light?
New Zealand law states that you must use a bike light from 30 minutes before sunset through to 30 minutes after sunrise. Law aside there are multiple reasons why you should use a bike light and it all comes down to your safety and the safety of others.
The first simple rule on a bike is you want to be as visible as you can be. Bike lights help you to be visible, help you be seen by others, they make you visible to motorists, other cyclists, and pedestrians. You should use a light when your visibility to others may be compromised. Some reasons include, when riding in high traffic volumes, or when there is poor weather conditions like rain or fog, or when the riding environment effects visibility like a narrow windy road, or in an environment that traffic is not expecting to see cyclists or when riding at twilight or at night.
USB rechargeable bike lights are a great be seen bike light solution. They may cost more on the initial purchase but once you have them they cost nothing to run. I hope that means we see more people choosing to ride with bike lights – to be more visible – in more environments not just at night time.
Note: Bike lights are one method of making you visible but there are other ways that will support the ultimate goal of being as visible as you can be. For example; reflective bands on moving parts e.g. your leg, or high vis vests & bright eye-catching helmet colours also help with the overall effect of helping you be seen.
You should use a bike light so you can see where you are going. If the light you are riding in compromises your ability to see the environment then you need to use bike lights to light up the environment. Make your path and it obstacles clearly visible. Save
Save
Save
Save[/vc_column_text][/vc_column_inner][/vc_row_inner][/vc_column][/vc_row][vc_row css=”.vc_custom_1501035143060{background-color: #0e9ca1 !important;background-position: center !important;background-repeat: no-repeat !important;background-size: cover !important;}”][vc_column width=”1/3″ delay=”0ms” css=”.vc_custom_1501035201263{border-right-width: 20px !important;border-left-width: 20px !important;border-left-color: #0e9ca1 !important;border-left-style: solid !important;border-right-color: #0e9ca1 !important;border-right-style: solid !important;}”][themeone_spacer height=”11px”][vc_column_text]
[/vc_column_text][themeone_spacer height=”11px”][/vc_column][/vc_row][vc_row css=”.vc_custom_1501035502617{background-color: #f1f1f1 !important;background-position: center !important;background-repeat: no-repeat !important;background-size: cover !important;}”][vc_column width=”1/3″ delay=”0ms” css=”.vc_custom_1501035523180{border-right-width: 20px !important;border-left-width: 20px !important;border-left-color: #f1f1f1 !important;border-left-style: solid !important;border-right-color: #f1f1f1 !important;border-right-style: solid !important;}”][vc_column_text]Riding in Traffic[/vc_column_text][/vc_column][vc_column width=”1/3″ delay=”0ms” css=”.vc_custom_1501035543941{border-right-width: 20px !important;border-left-width: 20px !important;border-left-color: #f1f1f1 !important;border-left-style: solid !important;border-right-color: #f1f1f1 !important;border-right-style: solid !important;}”][vc_column_text]5-200lumens, flashing mode[/vc_column_text][/vc_column][vc_column width=”1/3″ delay=”0ms” css=”.vc_custom_1501035562352{border-right-width: 20px !important;border-left-width: 20px !important;border-left-color: #f1f1f1 !important;border-left-style: solid !important;border-right-color: #f1f1f1 !important;border-right-style: solid !important;}”][vc_column_text]5 plus lumens, Flashing[/vc_column_text][/vc_column][/vc_row][vc_row css=”.vc_custom_1501035653402{background-color: #cccccc !important;background-position: center !important;background-repeat: no-repeat !important;background-size: cover !important;}”][vc_column width=”1/3″ delay=”0ms” css=”.vc_custom_1501062171509{border-right-width: 20px !important;border-left-width: 20px !important;border-left-color: #cccccc !important;border-left-style: solid !important;border-right-color: #cccccc !important;border-right-style: solid !important;}”][vc_column_text]Riding in poor weather conditions[/vc_column_text][/vc_column][vc_column width=”1/3″ delay=”0ms” css=”.vc_custom_1501035685375{border-right-width: 20px !important;border-left-width: 20px !important;border-left-color: #cccccc !important;border-left-style: solid !important;border-right-color: #cccccc !important;border-right-style: solid !important;}”][vc_column_text]5-200lumens, flashing mode[/vc_column_text][/vc_column][vc_column width=”1/3″ delay=”0ms” css=”.vc_custom_1501035718399{border-right-width: 20px !important;border-left-width: 20px !important;border-left-color: #cccccc !important;border-left-style: solid !important;border-right-color: #cccccc !important;border-right-style: solid !important;}”][vc_column_text]5 plus lumens, Flashing[/vc_column_text][/vc_column][/vc_row][vc_row css=”.vc_custom_1501035502617{background-color: #f1f1f1 !important;background-position: center !important;background-repeat: no-repeat !important;background-size: cover !important;}”][vc_column width=”1/3″ delay=”0ms” css=”.vc_custom_1501035523180{border-right-width: 20px !important;border-left-width: 20px !important;border-left-color: #f1f1f1 !important;border-left-style: solid !important;border-right-color: #f1f1f1 !important;border-right-style: solid !important;}”][vc_column_text]Riding on narrow windy roads[/vc_column_text][/vc_column][vc_column width=”1/3″ delay=”0ms” css=”.vc_custom_1501035543941{border-right-width: 20px !important;border-left-width: 20px !important;border-left-color: #f1f1f1 !important;border-left-style: solid !important;border-right-color: #f1f1f1 !important;border-right-style: solid !important;}”][vc_column_text]5-200lumens, flashing mode[/vc_column_text][/vc_column][vc_column width=”1/3″ delay=”0ms” css=”.vc_custom_1501035562352{border-right-width: 20px !important;border-left-width: 20px !important;border-left-color: #f1f1f1 !important;border-left-style: solid !important;border-right-color: #f1f1f1 !important;border-right-style: solid !important;}”][vc_column_text]5 plus lumens, Flashing[/vc_column_text][/vc_column][/vc_row][vc_row css=”.vc_custom_1501035653402{background-color: #cccccc !important;background-position: center !important;background-repeat: no-repeat !important;background-size: cover !important;}”][vc_column width=”1/3″ delay=”0ms” css=”.vc_custom_1501059006996{border-right-width: 20px !important;border-left-width: 20px !important;border-left-color: #cccccc !important;border-left-style: solid !important;border-right-color: #cccccc !important;border-right-style: solid !important;}”][vc_column_text]Riding at dawn or dusk[/vc_column_text][/vc_column][vc_column width=”1/3″ delay=”0ms” css=”.vc_custom_1501035685375{border-right-width: 20px !important;border-left-width: 20px !important;border-left-color: #cccccc !important;border-left-style: solid !important;border-right-color: #cccccc !important;border-right-style: solid !important;}”][vc_column_text]5-200lumens, flashing mode[/vc_column_text][/vc_column][vc_column width=”1/3″ delay=”0ms” css=”.vc_custom_1501035718399{border-right-width: 20px !important;border-left-width: 20px !important;border-left-color: #cccccc !important;border-left-style: solid !important;border-right-color: #cccccc !important;border-right-style: solid !important;}”][vc_column_text]5 plus lumens, Flashing[/vc_column_text][/vc_column][/vc_row][vc_row css=”.vc_custom_1501035502617{background-color: #f1f1f1 !important;background-position: center !important;background-repeat: no-repeat !important;background-size: cover !important;}”][vc_column width=”1/3″ delay=”0ms” css=”.vc_custom_1501035523180{border-right-width: 20px !important;border-left-width: 20px !important;border-left-color: #f1f1f1 !important;border-left-style: solid !important;border-right-color: #f1f1f1 !important;border-right-style: solid !important;}”][vc_column_text]Riding at night in well lit areas[/vc_column_text][/vc_column][vc_column width=”1/3″ delay=”0ms” css=”.vc_custom_1501035543941{border-right-width: 20px !important;border-left-width: 20px !important;border-left-color: #f1f1f1 !important;border-left-style: solid !important;border-right-color: #f1f1f1 !important;border-right-style: solid !important;}”][vc_column_text]5-200lumens, flashing mode[/vc_column_text][/vc_column][vc_column width=”1/3″ delay=”0ms” css=”.vc_custom_1501035562352{border-right-width: 20px !important;border-left-width: 20px !important;border-left-color: #f1f1f1 !important;border-left-style: solid !important;border-right-color: #f1f1f1 !important;border-right-style: solid !important;}”][vc_column_text]5 plus lumens, Flashing[/vc_column_text][/vc_column][/vc_row][vc_row css=”.vc_custom_1501035653402{background-color: #cccccc !important;background-position: center !important;background-repeat: no-repeat !important;background-size: cover !important;}”][vc_column width=”1/3″ delay=”0ms” css=”.vc_custom_1501059023546{border-right-width: 20px !important;border-left-width: 20px !important;border-left-color: #cccccc !important;border-left-style: solid !important;border-right-color: #cccccc !important;border-right-style: solid !important;}”][vc_column_text]Riding on the road and cycleways through darkness[/vc_column_text][/vc_column][vc_column width=”1/3″ delay=”0ms” css=”.vc_custom_1501035685375{border-right-width: 20px !important;border-left-width: 20px !important;border-left-color: #cccccc !important;border-left-style: solid !important;border-right-color: #cccccc !important;border-right-style: solid !important;}”][vc_column_text]250 -700/800lumens . Consider stacking 1 light constant 1 light flashing mode[/vc_column_text][/vc_column][vc_column width=”1/3″ delay=”0ms” css=”.vc_custom_1501035718399{border-right-width: 20px !important;border-left-width: 20px !important;border-left-color: #cccccc !important;border-left-style: solid !important;border-right-color: #cccccc !important;border-right-style: solid !important;}”][vc_column_text]Rear light drivers can see from 500m+. Consider vertical stacking one flashing, one on constant beam[/vc_column_text][/vc_column][/vc_row][vc_row css=”.vc_custom_1501035502617{background-color: #f1f1f1 !important;background-position: center !important;background-repeat: no-repeat !important;background-size: cover !important;}”][vc_column width=”1/3″ delay=”0ms” css=”.vc_custom_1501035523180{border-right-width: 20px !important;border-left-width: 20px !important;border-left-color: #f1f1f1 !important;border-left-style: solid !important;border-right-color: #f1f1f1 !important;border-right-style: solid !important;}”][vc_column_text]Riding at night off-road mountain bike trail riding[/vc_column_text][/vc_column][vc_column width=”1/3″ delay=”0ms” css=”.vc_custom_1501035543941{border-right-width: 20px !important;border-left-width: 20px !important;border-left-color: #f1f1f1 !important;border-left-style: solid !important;border-right-color: #f1f1f1 !important;border-right-style: solid !important;}”][vc_column_text]1200 lumens plus steady beam[/vc_column_text][/vc_column][vc_column width=”1/3″ delay=”0ms” css=”.vc_custom_1501035562352{border-right-width: 20px !important;border-left-width: 20px !important;border-left-color: #f1f1f1 !important;border-left-style: solid !important;border-right-color: #f1f1f1 !important;border-right-style: solid !important;}”][vc_column_text][/vc_column_text][/vc_column][/vc_row][vc_row css=”.vc_custom_1501035653402{background-color: #cccccc !important;background-position: center !important;background-repeat: no-repeat !important;background-size: cover !important;}”][vc_column width=”1/3″ delay=”0ms” css=”.vc_custom_1501059051340{border-right-width: 20px !important;border-left-width: 20px !important;border-left-color: #cccccc !important;border-left-style: solid !important;border-right-color: #cccccc !important;border-right-style: solid !important;}”][vc_column_text]Kids riding during the day or scootering on the footpath[/vc_column_text][/vc_column][vc_column width=”1/3″ delay=”0ms” css=”.vc_custom_1501035685375{border-right-width: 20px !important;border-left-width: 20px !important;border-left-color: #cccccc !important;border-left-style: solid !important;border-right-color: #cccccc !important;border-right-style: solid !important;}”][vc_column_text]5 plus lumens, flashing mode[/vc_column_text][/vc_column][vc_column width=”1/3″ delay=”0ms” css=”.vc_custom_1501035718399{border-right-width: 20px !important;border-left-width: 20px !important;border-left-color: #cccccc !important;border-left-style: solid !important;border-right-color: #cccccc !important;border-right-style: solid !important;}”][vc_column_text]Flashing light , high so in the line of drivers[/vc_column_text][/vc_column][/vc_row][vc_row css=”.vc_custom_1501058872148{background-color: #ffffff !important;background-position: center !important;background-repeat: no-repeat !important;background-size: cover !important;}”][vc_column][vc_column_text]
Save[/vc_column_text][themeone_spacer height=”44px”][/vc_column][/vc_row][vc_row][vc_column][vc_row_inner equal_height=”yes”][vc_column_inner width=”1/2″][vc_single_image image=”10430″ img_size=”800x 400″][vc_column_text]Riding at twilight with a front light to be visible.[/vc_column_text][/vc_column_inner][vc_column_inner width=”1/2″][vc_single_image image=”8665″ img_size=”800x 300″][vc_column_text]Riding at twilight with vertically stacked lights 1 flashing, 1 a steady beam to be visible.[/vc_column_text][/vc_column_inner][/vc_row_inner][themeone_spacer height=”44px”][/vc_column][/vc_row][vc_row css=”.vc_custom_1500939176338{background-color: #f1f1f1 !important;background-position: center !important;background-repeat: no-repeat !important;background-size: cover !important;}”][vc_column][themeone_spacer height=”41px”][vc_column_text]
Thanks for reading. Used together our stories, resources & products support you to achieve and develop as a rider.


 mounts are usually attached to the handlebars for the front bike light and the seat post for the rear light. This mount has a quick release system that allows you to attach & remove the bike light.